


...thats french for Community Yard Sale (or so I'm told). This saturday morning, the 6th, from 8 - 1, our neighborhood is holding just such a sale - and what better way to introduce Joey Biscotti to the unsuspecting hordes? Joe has been doing the preparations for Snickerdoodles today, while I've been baking up many a mini cheesecake, making lemon curd, and designing signs to post that will entice people into our fragrant front yard. Tomorrow will be about producing Joeltz (our caffiene-infused hazelnut brownie bites that are topped with coffee frosting and a dark chocolate covered espresso bean), sour cream chocolate cupcakes, and possibly another batch of mini cheesecakes (today was mandarin orange, tomorrow may be double chocolate).
Dontcha wish you could be there? (any Brandon/Tampa locals wanting to stop on by are welcome - just email me for directions).
Ok - back to work...
Ciao for now
'Da boys
Thursday, June 4, 2009


Wednesday, May 27, 2009
That Apple Strudel is Tasty!!!
The May Daring Bakers’ challenge was hosted by Linda of make life sweeter! and Courtney of Coco Cooks. They chose Apple Strudel from the recipe book Kaffeehaus: Exquisite Desserts from the Classic Cafés of Vienna, Budapest and Prague by Rick Rodgers...
So here is the first full Daring Bakers Challenge post since we've moved to Fla-la-land... I'd always had a fear of making very thin pastry dough, thinking that it wouldn't be thin enough, or become full of holes that would be difficult to repair, or any number of other catastrophe's, but this dough, I had no problem with!!! Well, I did have one little issue... I couldn't get the dough to stretch to the correct measurements of 2' by 3' so I think I had too much filling for the size of the dough... In the end, though, the only thing that didn't seem quite right was the fact the the breadcrumbs sort of spilled out of the pastry upon slicing... Also, the only alteration I made was substituting dried cranberries for the raisins...
But, onward... first, the recipe then the photos...
Preparation time
Total: 2 hours 15 minutes – 3 hours 30 minutes
15-20 min to make dough
30-90 min to let dough rest/to prepare the filling
20-30 min to roll out and stretch dough
10 min to fill and roll dough
30 min to bake
30 min to cool
Apple strudel
from “Kaffeehaus – Exquisite Desserts from the Classic Cafés of Vienna, Budapest and Prague” by Rick Rodgers
2 tablespoons (30 ml) golden rum
3 tablespoons (45 ml) raisins
1/4 teaspoon ground cinnamon
1/3 cup plus 1 tablespoon (80 g) sugar
1/2 cup (1 stick / 115 g) unsalted butter, melted, divided
1 1/2 cups (350 ml) fresh bread crumbs
strudel dough (recipe below)
1/2 cup (120 ml, about 60 g) coarsely chopped walnuts
2 pounds (900 g) tart cooking apples, peeled, cored and cut into ¼ inch-thick slices (use apples that hold their shape during baking)
1. Mix the rum and raisins in a bowl. Mix the cinnamon and sugar in another bowl.
2. Heat 3 tablespoons of the butter in a large skillet over medium-high. Add the breadcrumbs and cook whilst stirring until golden and toasted. This will take about 3 minutes. Let it cool completely.
3. Put the rack in the upper third of the oven and preheat the oven to 400°F (200°C). Line a large baking sheet with baking paper (parchment paper). Make the strudel dough as described below. Spread about 3 tablespoons of the remaining melted butter over the dough using your hands (a bristle brush could tear the dough, you could use a special feather pastry brush instead of your hands). Sprinkle the buttered dough with the bread crumbs. Spread the walnuts about 3 inches (8 cm) from the short edge of the dough in a 6-inch-(15cm)-wide strip. Mix the apples with the raisins (including the rum), and the cinnamon sugar. Spread the mixture over the walnuts.
4. Fold the short end of the dough onto the filling. Lift the tablecloth at the short end of the dough so that the strudel rolls onto itself. Transfer the strudel to the prepared baking sheet by lifting it. Curve it into a horseshoe to fit. Tuck the ends under the strudel. Brush the top with the remaining melted butter.
5. Bake the strudel for about 30 minutes or until it is deep golden brown. Cool for at least 30 minutes before slicing. Use a serrated knife and serve either warm or at room temperature. It is best on the day it is baked.
Strudel dough
from “Kaffeehaus – Exquisite Desserts from the Classic Cafés of Vienna, Budapest and Prague” by Rick Rodgers
1 1/3 cups (200 g) unbleached flour
1/8 teaspoon salt
7 tablespoons (105 ml) water, plus more if needed
2 tablespoons (30 ml) vegetable oil, plus additional for coating the dough
1/2 teaspoon cider vinegar
1. Combine the flour and salt in a stand-mixer fitted with the paddle attachment. Mix the water, oil and vinegar in a measuring cup. Add the water/oil mixture to the flour with the mixer on low speed. You will get a soft dough. Make sure it is not too dry, add a little more water if necessary.
Take the dough out of the mixer. Change to the dough hook. Put the dough ball back in the mixer. Let the dough knead on medium until you get a soft dough ball with a somewhat rough surface.
2. Take the dough out of the mixer and continue kneading by hand on an unfloured work surface. Knead for about 2 minutes. Pick up the dough and throw it down hard onto your working surface occasionally.
Shape the dough into a ball and transfer it to a plate. Oil the top of the dough ball lightly. Cover the ball tightly with plastic wrap. Allow to stand for 30-90 minutes (longer is better).
3. It would be best if you have a work area that you can walk around on all sides like a 36 inch (90 cm) round table or a work surface of 23 x 38 inches (60 x 100 cm). Cover your working area with table cloth, dust it with flour and rub it into the fabric. Put your dough ball in the middle and roll it out as much as you can.
Pick the dough up by holding it by an edge. This way the weight of the dough and gravity can help stretching it as it hangs. Using the back of your hands to gently stretch and pull the dough. You can use your forearms to support it.
4. The dough will become too large to hold. Put it on your work surface. Leave the thicker edge of the dough to hang over the edge of the table. Place your hands underneath the dough and stretch and pull the dough thinner using the backs of your hands. Stretch and pull the dough until it's about 2 feet (60 cm) wide and 3 feet (90 cm) long, it will be tissue-thin by this time. Cut away the thick dough around the edges with scissors. The dough is now ready to be filled.
Tips
- Ingredients are cheap so we would recommend making a double batch of the dough, that way you can practice the pulling and stretching of the dough with the first batch and if it doesn't come out like it should you can use the second batch to give it another try;
- The tablecloth can be cotton or polyster;
- Before pulling and stretching the dough, remove your jewelry from hands and wrists, and wear short-sleeves;
- To make it easier to pull the dough, you can use your hip to secure the dough against the edge of the table;
- Few small holes in the dough is not a problem as the dough will be rolled, making (most of) the holes invisible.
Both Courtney and I did a trial run on making the strudel. Below are our notes:
Courtney's notes
- She could't get it to stretch to 2 feet by 3 feet, it turned out more like 2 feet by 2 feet. But the dough was tissue thin nevertheless;
- She got some serious holes, but after rolling it wasn't noticeable;
- She used a large cheese cloth which helped manipulate and stretch the dough more than a heavier cloth would have.
Linda's notes
- I made the dough by hand, just mixed the wet ingredients into the dry ingredients with a wooden spoon. Kneaded it for about 5 min like you would bread dough. This worked as well. Haven't tried using a standmixer so I don't know how it compares.
- Instead of cider vinegar I used red wine vinegar;
- I used bread flour;
- Picking up the dough to let it stretch didn't work well for me, holes appeared pretty much instantly. Instead I stretched the dough while it was lying on the tablecloth by putting my hands underneath and stretching it out further and further;
Here's a link to a strudelmaking video that might help you a bit...
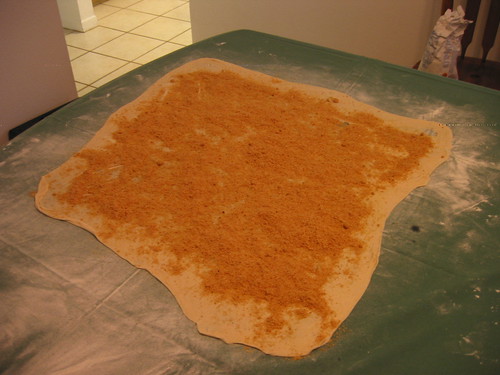
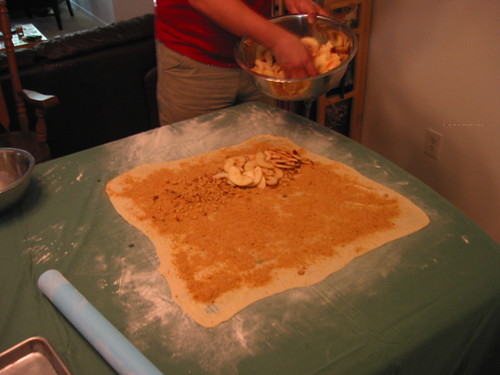
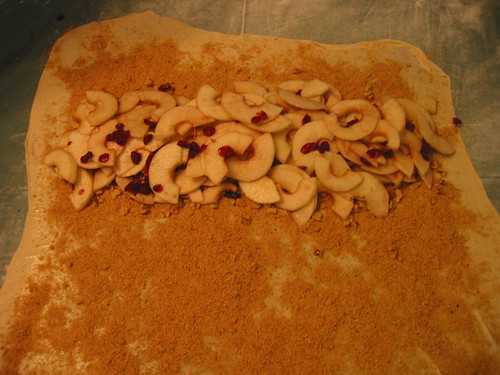
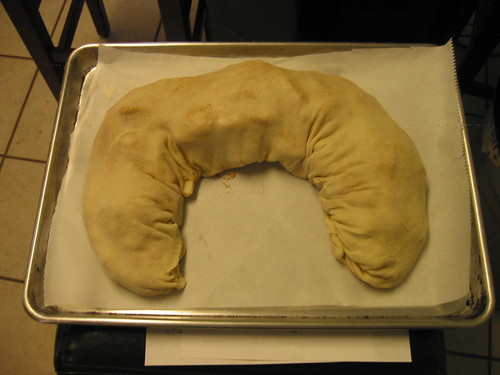
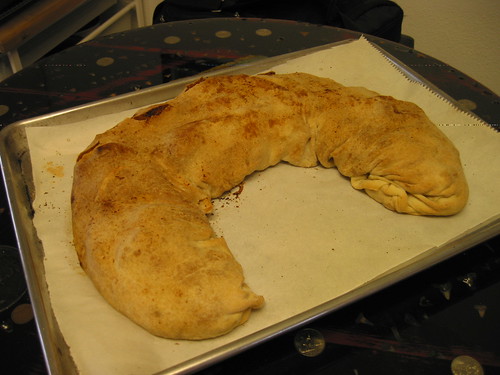
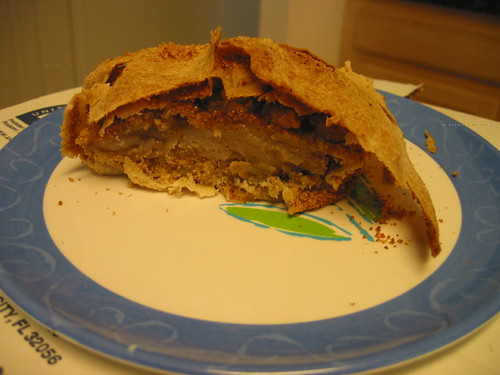

So here is the first full Daring Bakers Challenge post since we've moved to Fla-la-land... I'd always had a fear of making very thin pastry dough, thinking that it wouldn't be thin enough, or become full of holes that would be difficult to repair, or any number of other catastrophe's, but this dough, I had no problem with!!! Well, I did have one little issue... I couldn't get the dough to stretch to the correct measurements of 2' by 3' so I think I had too much filling for the size of the dough... In the end, though, the only thing that didn't seem quite right was the fact the the breadcrumbs sort of spilled out of the pastry upon slicing... Also, the only alteration I made was substituting dried cranberries for the raisins...
But, onward... first, the recipe then the photos...
Preparation time
Total: 2 hours 15 minutes – 3 hours 30 minutes
15-20 min to make dough
30-90 min to let dough rest/to prepare the filling
20-30 min to roll out and stretch dough
10 min to fill and roll dough
30 min to bake
30 min to cool
Apple strudel
from “Kaffeehaus – Exquisite Desserts from the Classic Cafés of Vienna, Budapest and Prague” by Rick Rodgers
2 tablespoons (30 ml) golden rum
3 tablespoons (45 ml) raisins
1/4 teaspoon ground cinnamon
1/3 cup plus 1 tablespoon (80 g) sugar
1/2 cup (1 stick / 115 g) unsalted butter, melted, divided
1 1/2 cups (350 ml) fresh bread crumbs
strudel dough (recipe below)
1/2 cup (120 ml, about 60 g) coarsely chopped walnuts
2 pounds (900 g) tart cooking apples, peeled, cored and cut into ¼ inch-thick slices (use apples that hold their shape during baking)
1. Mix the rum and raisins in a bowl. Mix the cinnamon and sugar in another bowl.
2. Heat 3 tablespoons of the butter in a large skillet over medium-high. Add the breadcrumbs and cook whilst stirring until golden and toasted. This will take about 3 minutes. Let it cool completely.
3. Put the rack in the upper third of the oven and preheat the oven to 400°F (200°C). Line a large baking sheet with baking paper (parchment paper). Make the strudel dough as described below. Spread about 3 tablespoons of the remaining melted butter over the dough using your hands (a bristle brush could tear the dough, you could use a special feather pastry brush instead of your hands). Sprinkle the buttered dough with the bread crumbs. Spread the walnuts about 3 inches (8 cm) from the short edge of the dough in a 6-inch-(15cm)-wide strip. Mix the apples with the raisins (including the rum), and the cinnamon sugar. Spread the mixture over the walnuts.
4. Fold the short end of the dough onto the filling. Lift the tablecloth at the short end of the dough so that the strudel rolls onto itself. Transfer the strudel to the prepared baking sheet by lifting it. Curve it into a horseshoe to fit. Tuck the ends under the strudel. Brush the top with the remaining melted butter.
5. Bake the strudel for about 30 minutes or until it is deep golden brown. Cool for at least 30 minutes before slicing. Use a serrated knife and serve either warm or at room temperature. It is best on the day it is baked.
Strudel dough
from “Kaffeehaus – Exquisite Desserts from the Classic Cafés of Vienna, Budapest and Prague” by Rick Rodgers
1 1/3 cups (200 g) unbleached flour
1/8 teaspoon salt
7 tablespoons (105 ml) water, plus more if needed
2 tablespoons (30 ml) vegetable oil, plus additional for coating the dough
1/2 teaspoon cider vinegar
1. Combine the flour and salt in a stand-mixer fitted with the paddle attachment. Mix the water, oil and vinegar in a measuring cup. Add the water/oil mixture to the flour with the mixer on low speed. You will get a soft dough. Make sure it is not too dry, add a little more water if necessary.
Take the dough out of the mixer. Change to the dough hook. Put the dough ball back in the mixer. Let the dough knead on medium until you get a soft dough ball with a somewhat rough surface.
2. Take the dough out of the mixer and continue kneading by hand on an unfloured work surface. Knead for about 2 minutes. Pick up the dough and throw it down hard onto your working surface occasionally.
Shape the dough into a ball and transfer it to a plate. Oil the top of the dough ball lightly. Cover the ball tightly with plastic wrap. Allow to stand for 30-90 minutes (longer is better).
3. It would be best if you have a work area that you can walk around on all sides like a 36 inch (90 cm) round table or a work surface of 23 x 38 inches (60 x 100 cm). Cover your working area with table cloth, dust it with flour and rub it into the fabric. Put your dough ball in the middle and roll it out as much as you can.
Pick the dough up by holding it by an edge. This way the weight of the dough and gravity can help stretching it as it hangs. Using the back of your hands to gently stretch and pull the dough. You can use your forearms to support it.
4. The dough will become too large to hold. Put it on your work surface. Leave the thicker edge of the dough to hang over the edge of the table. Place your hands underneath the dough and stretch and pull the dough thinner using the backs of your hands. Stretch and pull the dough until it's about 2 feet (60 cm) wide and 3 feet (90 cm) long, it will be tissue-thin by this time. Cut away the thick dough around the edges with scissors. The dough is now ready to be filled.
Tips
- Ingredients are cheap so we would recommend making a double batch of the dough, that way you can practice the pulling and stretching of the dough with the first batch and if it doesn't come out like it should you can use the second batch to give it another try;
- The tablecloth can be cotton or polyster;
- Before pulling and stretching the dough, remove your jewelry from hands and wrists, and wear short-sleeves;
- To make it easier to pull the dough, you can use your hip to secure the dough against the edge of the table;
- Few small holes in the dough is not a problem as the dough will be rolled, making (most of) the holes invisible.
Both Courtney and I did a trial run on making the strudel. Below are our notes:
Courtney's notes
- She could't get it to stretch to 2 feet by 3 feet, it turned out more like 2 feet by 2 feet. But the dough was tissue thin nevertheless;
- She got some serious holes, but after rolling it wasn't noticeable;
- She used a large cheese cloth which helped manipulate and stretch the dough more than a heavier cloth would have.
Linda's notes
- I made the dough by hand, just mixed the wet ingredients into the dry ingredients with a wooden spoon. Kneaded it for about 5 min like you would bread dough. This worked as well. Haven't tried using a standmixer so I don't know how it compares.
- Instead of cider vinegar I used red wine vinegar;
- I used bread flour;
- Picking up the dough to let it stretch didn't work well for me, holes appeared pretty much instantly. Instead I stretched the dough while it was lying on the tablecloth by putting my hands underneath and stretching it out further and further;
Here's a link to a strudelmaking video that might help you a bit...
Tuesday, April 28, 2009
A Cheesecake Challenge
The April 2009 challenge is hosted by Jenny from Jenny Bakes. She has chosen Abbey's Infamous Cheesecake as the challenge.
Hello, all... Cheesecake, it is... No problems here since cheesecake is one of our specialties!!! BUT since we have moved from the lovely state of New York to the lovely state of Florida, and have NO idea where our cameras are, we were unable to take photos in time...
Abbey's Infamous Cheesecake:
crust:
2 cups / 180 g graham cracker crumbs
1 stick / 4 oz butter, melted
2 tbsp. / 24 g sugar
1 tsp. vanilla extract
cheesecake:
3 sticks of cream cheese, 8 oz each (total of 24 oz) room temperature
1 cup / 210 g sugar
3 large eggs
1 cup / 8 oz heavy cream
1 tbsp. lemon juice
1 tbsp. vanilla extract (or the innards of a vanilla bean)
1 tbsp liqueur, optional, but choose what will work well with your cheesecake
DIRECTIONS:
1. Preheat oven to 350 degrees F (Gas Mark 4 = 180C = Moderate heat). Begin to boil a large pot of water for the water bath.
2. Mix together the crust ingredients and press into your preferred pan. You can press the crust just into the bottom, or up the sides of the pan too - baker's choice. Set crust aside.
3. Combine cream cheese and sugar in the bowl of a stand-mixer (or in a large bowl if using a hand-mixer) and cream together until smooth. Add eggs, one at a time, fully incorporating each before adding the next. Make sure to scrape down the bowl in between each egg. Add heavy cream, vanilla, lemon juice, and alcohol and blend until smooth and creamy.
4. Pour batter into prepared crust and tap the pan on the counter a few times to bring all air bubbles to the surface. Place pan into a larger pan and pour boiling water into the larger pan until halfway up the side of the cheesecake pan. If cheesecake pan is not airtight, cover bottom securely with foil before adding water.
5. Bake 45 to 55 minutes, until it is almost done - this can be hard to judge, but you're looking for the cake to hold together, but still have a lot of jiggle to it in the center. You don't want it to be completely firm at this stage. Close the oven door, turn the heat off, and let rest in the cooling oven for one hour. This lets the cake finish cooking and cool down gently enough so that it won't crack on the top. After one hour, remove cheesecake from oven and lift carefully out of water bath. Let it finish cooling on the counter, and then cover and put in the fridge to chill. Once fully chilled, it is ready to serve.
Pan note: The creator of this recipe used to use a springform pan, but no matter how well she wrapped the thing in tin foil, water would always seep in and make the crust soggy. Now she uses one of those 1-use foil "casserole" shaped pans from the grocery store. They're 8 or 9 inches wide and really deep, and best of all, water-tight. When it comes time to serve, just cut the foil away.
Prep notes: While the actual making of this cheesecake is a minimal time commitment, it does need to bake for almost an hour, cool in the oven for an hour, and chill overnight before it is served. Please plan accordingly!
So we used this basic recipe and added our raspberry coulis to make our famous raspberry heart cheesecake... It came out almost exactly the same as the recipe we used and tasted just as delicious!!!
Our apologies about no photos, but we're up for next month's challenge!!! Now on to warmer weather!!!
Hello, all... Cheesecake, it is... No problems here since cheesecake is one of our specialties!!! BUT since we have moved from the lovely state of New York to the lovely state of Florida, and have NO idea where our cameras are, we were unable to take photos in time...
Abbey's Infamous Cheesecake:
crust:
2 cups / 180 g graham cracker crumbs
1 stick / 4 oz butter, melted
2 tbsp. / 24 g sugar
1 tsp. vanilla extract
cheesecake:
3 sticks of cream cheese, 8 oz each (total of 24 oz) room temperature
1 cup / 210 g sugar
3 large eggs
1 cup / 8 oz heavy cream
1 tbsp. lemon juice
1 tbsp. vanilla extract (or the innards of a vanilla bean)
1 tbsp liqueur, optional, but choose what will work well with your cheesecake
DIRECTIONS:
1. Preheat oven to 350 degrees F (Gas Mark 4 = 180C = Moderate heat). Begin to boil a large pot of water for the water bath.
2. Mix together the crust ingredients and press into your preferred pan. You can press the crust just into the bottom, or up the sides of the pan too - baker's choice. Set crust aside.
3. Combine cream cheese and sugar in the bowl of a stand-mixer (or in a large bowl if using a hand-mixer) and cream together until smooth. Add eggs, one at a time, fully incorporating each before adding the next. Make sure to scrape down the bowl in between each egg. Add heavy cream, vanilla, lemon juice, and alcohol and blend until smooth and creamy.
4. Pour batter into prepared crust and tap the pan on the counter a few times to bring all air bubbles to the surface. Place pan into a larger pan and pour boiling water into the larger pan until halfway up the side of the cheesecake pan. If cheesecake pan is not airtight, cover bottom securely with foil before adding water.
5. Bake 45 to 55 minutes, until it is almost done - this can be hard to judge, but you're looking for the cake to hold together, but still have a lot of jiggle to it in the center. You don't want it to be completely firm at this stage. Close the oven door, turn the heat off, and let rest in the cooling oven for one hour. This lets the cake finish cooking and cool down gently enough so that it won't crack on the top. After one hour, remove cheesecake from oven and lift carefully out of water bath. Let it finish cooling on the counter, and then cover and put in the fridge to chill. Once fully chilled, it is ready to serve.
Pan note: The creator of this recipe used to use a springform pan, but no matter how well she wrapped the thing in tin foil, water would always seep in and make the crust soggy. Now she uses one of those 1-use foil "casserole" shaped pans from the grocery store. They're 8 or 9 inches wide and really deep, and best of all, water-tight. When it comes time to serve, just cut the foil away.
Prep notes: While the actual making of this cheesecake is a minimal time commitment, it does need to bake for almost an hour, cool in the oven for an hour, and chill overnight before it is served. Please plan accordingly!
So we used this basic recipe and added our raspberry coulis to make our famous raspberry heart cheesecake... It came out almost exactly the same as the recipe we used and tasted just as delicious!!!
Our apologies about no photos, but we're up for next month's challenge!!! Now on to warmer weather!!!
Tuesday, March 31, 2009
The time has come, the walrus said....

...To get our butts to a warmer climate! We're packing up and getting out of Dodge - to be near family and the beach! Joe has been given a wonderful opportunity to open a new store in Tampa, Florida, and we're jumping on it. My entire family is within two hours of there, and since I haven't had much time to spend with my eighty-two-year-old mother in the past several years, I am thrilled to be moving to her area. We will be temporarily closing up shop here at Joey Biscotti! but once we get settled in Florida, we'll reopen with a sweet vengeance. We'll have to do some product testing down there and garner new customers, but we've found that, "if you bake it, they will come...." And we're excited about making new friends, but will dearly miss the old ones. We're so thankful to have met and been able to share our lives and our baked goods with so many of you here on the east coast, and though we'll be on the west coast of Florida - we're only moments away on the internet, and plan on staying that way. We'll still be able to ship cookies and biscotti, and hope that our friends from all over the country will continue to keep us in mind when ordering for those special occasions, holidays, and midnight snack attacks!
Stay tuned for interesting up-dates about our experience of moving and making a fresh start.
Ciao for now...
'Da Boys
Saturday, February 28, 2009
Rudolph's Brother
What am I talking about, Willis??? Yes, that's right... Chocolate Valentino... The February Daring Baker's Challenge... It was all about the chocolate and probably one if the easiest cakes to make, in terms of ingredients... three, to be exact... So simple, in fact, that I'm going to tell you all how to make it... But first, the "legalities"...
The February 2009 challenge is hosted by Wendy of WMPE's blog and Dharm of Dad ~ Baker & Chef. We have chosen a Chocolate Valentino cake by Chef Wan; a Vanilla Ice Cream recipe from Dharm and a Vanilla Ice Cream recipe from Wendy as the challenge...
While the guidelines stated that we were to pair the cake with the vanilla ice cream, we don't have an ice cream maker... There is a technique from David Lebovitz here that explains how to make ice cream without a machine, but, since we were allowed leeway to pair the cake with something else, we opted for a Grand Marnier whipped cream instead...
This is the cake recipe... It's just chocolate and eggs and butter...
Chocolate Valentino
Preparation Time: 20 minutes
16 ounces of semisweet chocolate, roughly chopped
1 stick plus 2 tablespoons of unsalted butter
5 large eggs separated
1. Put chocolate and butter in a heatproof bowl and set over a pan of simmering water (the bottom of the bowl should not touch the water) and melt, stirring often.
2. While your chocolate butter mixture is cooling. Butter your pan and line with a parchment circle then butter the parchment.
3. Separate the egg yolks from the egg whites and put into two medium/large bowls.
4. Whip the egg whites in a medium/large grease free bowl until stiff peaks are formed (do not over-whip or the cake will be dry).
5. With the same beater beat the egg yolks together.
6. Add the egg yolks to the cooled chocolate.
7. Fold in 1/3 of the egg whites into the chocolate mixture and follow with remaining 2/3rds. Fold until no white remains without deflating the batter.
8. Pour batter into prepared pan, the batter should fill the pan 3/4 of the way full, and bake at 375F/190C
9. Bake for 25 minutes until an instant read thermometer reads 140F/60C.
Note – If you do not have an instant read thermometer, the top of the cake will look similar to a brownie and a cake tester will appear wet.
10. Cool cake on a rack for 10 minutes then unmold.
The only mistake I made was i missed the two extra tablespoons of butter... It didn't seem to matter to us in the end, because the cake still had a PHENOMENAL taste!!!


Saturday, February 21, 2009
What goes well with Chocolate?
Hello folks. It's been a while since I had a chance to blog about our baking experiences, and I thought, well, as long as it's a winter Saturday, with no heat or hot water, and I'm forced to sit in front of this space heater and BAKE to keep warm - I might as well compose an up-date!
Last week Joe made the most fabulous cake - so freakin tall we couldn't fit it in any of our various boxes and had to construct one just for the occasion. Devil's Food with white chocolate/mint filling, layers of dark chocolate ganache and a mildly minty pale yellow buttercream frosting. OY was this one delicious. Four layers of heaven. Cake, ganache, mint filling, cake, ganache, mint filling - rinse and repeat...twice...only a very thin slice should be eaten at a sitting, because this one is so darned rich. We haven't thought of a name for it yet - but rest assured that its another keeper for our business.
Speaking of keepers, I have a Chocolate Caramel cheesecake in the oven as I type this - deep chocolate biscotti crust, layer of creamy caramel, and dark chocolate cheesecake filling...yum (I hope). This is one of those time when I have to keep reminding myself to have patience (something baking has truly helped me to achieve)...this one will have to cool on the rack for an hour or so, then refrigerated for three hours before we can TASTE it. Give me strength! I'm thinking of drizzling more caramel over the top and sprinkling with sea salt. Oops - my mouth just started to water. Did yours?
We are giving thoughts to what we want to serve up for the two up-coming holidays: St. Patrick's Day and Easter. I have a few thoughts, but will let those brew a bit longer until I'm (we're) ready to reveal the newest scrumptious delights from Joey Biscotti!
Satisfy your sweet tooth now - while we're still a small, personalized-service-oriented company. My intention is for us to always offer the service you've come to expect. Keep helping us to remember, as we grow, to always make YOU our number one priorty.
More later!
'Da boys...
Last week Joe made the most fabulous cake - so freakin tall we couldn't fit it in any of our various boxes and had to construct one just for the occasion. Devil's Food with white chocolate/mint filling, layers of dark chocolate ganache and a mildly minty pale yellow buttercream frosting. OY was this one delicious. Four layers of heaven. Cake, ganache, mint filling, cake, ganache, mint filling - rinse and repeat...twice...only a very thin slice should be eaten at a sitting, because this one is so darned rich. We haven't thought of a name for it yet - but rest assured that its another keeper for our business.
Speaking of keepers, I have a Chocolate Caramel cheesecake in the oven as I type this - deep chocolate biscotti crust, layer of creamy caramel, and dark chocolate cheesecake filling...yum (I hope). This is one of those time when I have to keep reminding myself to have patience (something baking has truly helped me to achieve)...this one will have to cool on the rack for an hour or so, then refrigerated for three hours before we can TASTE it. Give me strength! I'm thinking of drizzling more caramel over the top and sprinkling with sea salt. Oops - my mouth just started to water. Did yours?
We are giving thoughts to what we want to serve up for the two up-coming holidays: St. Patrick's Day and Easter. I have a few thoughts, but will let those brew a bit longer until I'm (we're) ready to reveal the newest scrumptious delights from Joey Biscotti!
Satisfy your sweet tooth now - while we're still a small, personalized-service-oriented company. My intention is for us to always offer the service you've come to expect. Keep helping us to remember, as we grow, to always make YOU our number one priorty.
More later!
'Da boys...
Thursday, January 29, 2009
What ... A challenge...
Hello, all... Let's talk about tools... er, tuiles... THe Daring Baker's January challenge was just that... a challenge...
This month's challenge is brought to us by Karen of Bake My Day and Zorra of 1x umruehren bitte aka Kochtopf. They have chosen Tuiles from The Chocolate Book by Angélique Schmeink and Nougatine and Chocolate Tuiles from Michel Roux.
I must say that I was a bit disappointed with our performance this month... I first had Steven try his hand at making these and, taking his inspiration from the butterflies suggested by the recipe itself, attempted to make angels, but the recipe wasn't conducive for the detail he was looking for beacuse the batter spreads so much during baking... But the cookie itself tasted really good... Unfortunately, no pictures of it...
Time passes, and we get busy with orders, but the challenge must be met again... This time I try my hand at it... I decided to go the simple route and just pipe circles... A couple of frustrations I had were 1) I didn't know how big the circles should be and 2) the greasing of the parchment paper (I couldn't get the batter to spread out with my offset since the batter just moved around the paper) and 3) I didn't know what the final outcome was supposed to be like... They always ended up more cake-y than crispy...
So, I flavored my batter with orange oil and was going to pair it with our famous homemade chocolate pudding, and just went ahead with the recipe... Since I didn't know how much batter to use for each cookie, I ended up with 4 larger circles, but they crisped up so much that they didn't bend so well and ended up close to flat...
My second attempt, I made the circles much smaller, and STILL could't get them to do anything more than look like a Pringle... I paired it up with the chocolate pudding anyway, and with the faint hint of orange, they tasted fantastic... But overall, I was disappointed with all three attempts...
And the final outcome... ta-da!!!!


This month's challenge is brought to us by Karen of Bake My Day and Zorra of 1x umruehren bitte aka Kochtopf. They have chosen Tuiles from The Chocolate Book by Angélique Schmeink and Nougatine and Chocolate Tuiles from Michel Roux.
I must say that I was a bit disappointed with our performance this month... I first had Steven try his hand at making these and, taking his inspiration from the butterflies suggested by the recipe itself, attempted to make angels, but the recipe wasn't conducive for the detail he was looking for beacuse the batter spreads so much during baking... But the cookie itself tasted really good... Unfortunately, no pictures of it...
Time passes, and we get busy with orders, but the challenge must be met again... This time I try my hand at it... I decided to go the simple route and just pipe circles... A couple of frustrations I had were 1) I didn't know how big the circles should be and 2) the greasing of the parchment paper (I couldn't get the batter to spread out with my offset since the batter just moved around the paper) and 3) I didn't know what the final outcome was supposed to be like... They always ended up more cake-y than crispy...
So, I flavored my batter with orange oil and was going to pair it with our famous homemade chocolate pudding, and just went ahead with the recipe... Since I didn't know how much batter to use for each cookie, I ended up with 4 larger circles, but they crisped up so much that they didn't bend so well and ended up close to flat...
My second attempt, I made the circles much smaller, and STILL could't get them to do anything more than look like a Pringle... I paired it up with the chocolate pudding anyway, and with the faint hint of orange, they tasted fantastic... But overall, I was disappointed with all three attempts...
And the final outcome... ta-da!!!!


Saturday, January 17, 2009
Gotta Lotta Lovin to do....

...and that's precisely what we've been up to. Lovin each and every morsel and ingredient that goes into our sweet treats. Treating them with tenderness and care, keeping them fresh and colorful, and incorporating as much love as possible, so that you'll taste it in each and every bite. We've added yet another wonderful goodie for you to share with someone special this year, and its a Double Chocolate Brownie with Raspberry chips and chocolate ganache topping. Large enough to share with your sweetie, (and rich enough that you just might have to - so get out there and get yourself someone to "spoon" with!) - these brownies have both bittersweet and semisweet chocolate in the mix, along with raspberry-shot chocolate chips, and are covered with a velvety thick layer of semisweet chocolate cream ganache, and, finally, drizzled with red chocolate. Delicioso! See our menu page for information on ordering some for the holiday (or just to snack on when you're in very chocolate mood!
More yummy stuff to come...
'Da boys
Tuesday, January 6, 2009
Love is in the air

....and so is the aroma of fresh baked goodies to tempt each and every one of your senses! This Valentine's Day, we're serving up some delicious, love-filled treats to share with that someone special in your life. The first offering we've come up with is our rich and decadent White Chocolate Raspberry Swirl cheesecake in chocolate biscotti crust, with some lovely heart-shaped designs that will say "I love you" in a very special way. We will be making our usual 9" size for those of you with a lot of love to spread around, and for the week of Valentine's Day, you can also order them in the more intimate 5 1/2" size, pictured here. You'll get 6 sweet little wedges out of the smaller size - enough for dessert for lunch AND dinner that day!
Be sure and tell all your married, courting or just plain amorous friends to get in touch with us soon, so as to order on time and not miss out on a single, creamy fork-full!
More love to come...
'Da boys
Saturday, December 20, 2008
When life gives you lemons (2)
Steven here. So. Last week when I was doing a lot of baking for clients (big surprise), I made an Apple Spice cake which, for some reason, decided to stick to the pan (I have no idea how that happened). Well, not being one to toss a perfectly good, albeit ugly, cake in the garbage, I decided to try something new (also a big surprise. Not.) Hmmmmmmm,,,what could I do with this lovely cake, brimming with granny smith apples, brown sugar and spices? A-Hah! Granny Smith apples happen to be a favorite late-night snack of Joe and I, and we always slather the quarters with peanut butter. Sounds strange, I know, but try it - it's a great combination. This led me to the idea to make Apple Spice and Peanut Butter bread pudding!!! It sounded heavenly to me (of course). So I set about doctoring my Chocolate Toffee bread pudding recipe, and came up with a lovely, mildly peanut-flavored pudding to pour over the pieces of Apple Spice cake in their little aluminum cups (this is how I always make bread puddings - they hold probably 3/4 cup of yumminess and it seems just the right amount for a single serving). I thought to myself that no one would find these as interesting as I do - but was I ever wrong! Joe and I each took a handfull of the delightful cups to work the next day and people RAVED about them. I kid you not. And we got an order for 15 from a co-worker of Joe's for Christmas. So the next time a recipe turns out not quite the way you hoped, try thinking outside of the pie pan, and put your imagination to work. You won't believe what lovely little new-fangled item you might come up with!
In case I don't get a chance to blog again this week, we wish everyone of you a lovely, fun-filled Holiday (whichever one you choose to celebrate), and we send out many good thoughts and much positive energy in hopes that you will all have a fantastic New Year!
Ciao for now...
'Da boys
In case I don't get a chance to blog again this week, we wish everyone of you a lovely, fun-filled Holiday (whichever one you choose to celebrate), and we send out many good thoughts and much positive energy in hopes that you will all have a fantastic New Year!
Ciao for now...
'Da boys
Monday, December 15, 2008
Just in time for Christmas

Thats the title of a favorite Nancy LaMott song (I highly recommend her Christmas album to anyone looking for a great holiday listen). Nancy, we wish you were still here to share your amazing talent with us all.
Now, back to business! This weekend I'm gonna make my famous Lemon Curd, and this year we've decided to package it and sell it as a great holiday gift. It will come in a 6 oz jar for $10.00, and we're even including a spoon - for those of you who can't wait to get home and open this little jar of citrus heaven. We're taking pre-orders for Christmas week, and will have it available for pick up in Hell's Kitchen.
Of course, we won't discourage you from ordering something ELSE holiday flavored (Eggnog cheesecake, anyone?). Our best-sellers so far this fall have been Pumpkin Cheesecake with Orange/Cranberry biscotti crust, Caramel Apple Cheesecake, Pumpkin pie with Cinnamon pecan struesel topping, and our cookies, of course. Please get those orders to us by friday the 19th, to gaurantee the freshest goods and pick up by the holiday.
We hope to hear from you all, and soon! And in case we don't get the chance to say it in person - Happy Holidays to you all, and thank you for your friendship and patronage this year - it has made a huge difference in our lives!
Ciao for now...
'Da boys
Tuesday, December 2, 2008
It's Sugar Time!!!
Once again, the Daring Bakers have challenged me to do something new... This month it was Caramel Cake... Shuna Fish Lydon's recipe for this month's challenge can be seen here... and this month's hosts were Dolores of Culinary Curiosity Alex (Brownie of the Blondie and Brownie duo: /), and Jenny of Foray into Food. And contributing the alternative recipe was Natalie of Gluten-a-Go-Go...
I had never made caramel or worked with sugar in this way before so I was a little frightened of possible burns while the sugar cooked, BUT i was fine... The only real issue I had was probably my own lack of experience with sugar, and I don't think that I cooked it long enough, but it didn't seem to affect falvor at all...
Anyway, our post is a few days late, what with the holiday but here are the photos of this most luscious and moist cake... We each had two slices before putting the cake to bed for the night... Then Steven took it in to work where, somehow, it disappeared as he crossed the threshold...
And now, a few photos...


By the way, I had promised this cake for Steven's birthday today... If two slices is any indication, he enjoyed it!
and now, on to the December Challenge... We'll keep you posted!!!
I had never made caramel or worked with sugar in this way before so I was a little frightened of possible burns while the sugar cooked, BUT i was fine... The only real issue I had was probably my own lack of experience with sugar, and I don't think that I cooked it long enough, but it didn't seem to affect falvor at all...
Anyway, our post is a few days late, what with the holiday but here are the photos of this most luscious and moist cake... We each had two slices before putting the cake to bed for the night... Then Steven took it in to work where, somehow, it disappeared as he crossed the threshold...
And now, a few photos...
By the way, I had promised this cake for Steven's birthday today... If two slices is any indication, he enjoyed it!
and now, on to the December Challenge... We'll keep you posted!!!
Saturday, November 8, 2008
Isn't it a lovely day to go out in the rain?
Today, we're semi-relaxing at home after shopping in the rain this AM. After lunch, I made an apple Crostata (sort of a rustic, open-faced apple pie) and I'm waiting for it to thoroughly cool so we can give it a try. It's been a while, and I wanted to polish up my skills, because we already have orders for them for the holidays, and I wanted to tweak the recipe and see if I can make it even better (I know - its not easy, being a perfectionist!).
Yesterday we attended the New York City Chocolate Show at Pier 94. I think I still have a hangover from all the sugar, chocolate and caffeine. There was a lot to taste, a lot to see, and some great inspiration, not to mention lovely people with wonderful ideas. We got to watch the owners of Baked (in Redhook) make their rootbeer bundt cake and give it a try. I even tasted a truffle made of blue cheese and chocolate (not a half bad combination, I must admit). There were chocolate fashions on display from the opening celebrations, which Joe took photos of, and overall a good day was had by all. On the way home from the show, as we enjoyed the not-too-cool weather and some much needed time together, we talked about making available our wonderful Lemon Curd, so that people can give it as holiday gifts this year. We purchased some lovely little glass jars to put it in and now all we have to do is whip up a batch and fill the jars and voila, yet another fun and delicious item to put on our menu. Everyone who has tasted it has raved, and when we're using it to fill cakes and make lemon buttercream, we always find ourselves eating it right off a spoon, not even taking the time to spread it on a cracker or piece of shortbread. I know that anyone who loves fresh citrus will love having a jar of this in the fridge to partake of in so many different, delicious ways. I only wish we'd thought of this earlier!
More to come soon, fellow foodies, and don't forget that we still offer gift certificates for those who have dessertaholics in their families, which means that you can purchase one and give it for a special occasion, or just to brighten someone's day. (or even to use as a stocking suffer on December 24, should you be so inclined.) That way, the receiver will get to decide what delictable dessert they want to dive into, whenever they get a craving!
Ciao for now, folks...
'Da boys
Yesterday we attended the New York City Chocolate Show at Pier 94. I think I still have a hangover from all the sugar, chocolate and caffeine. There was a lot to taste, a lot to see, and some great inspiration, not to mention lovely people with wonderful ideas. We got to watch the owners of Baked (in Redhook) make their rootbeer bundt cake and give it a try. I even tasted a truffle made of blue cheese and chocolate (not a half bad combination, I must admit). There were chocolate fashions on display from the opening celebrations, which Joe took photos of, and overall a good day was had by all. On the way home from the show, as we enjoyed the not-too-cool weather and some much needed time together, we talked about making available our wonderful Lemon Curd, so that people can give it as holiday gifts this year. We purchased some lovely little glass jars to put it in and now all we have to do is whip up a batch and fill the jars and voila, yet another fun and delicious item to put on our menu. Everyone who has tasted it has raved, and when we're using it to fill cakes and make lemon buttercream, we always find ourselves eating it right off a spoon, not even taking the time to spread it on a cracker or piece of shortbread. I know that anyone who loves fresh citrus will love having a jar of this in the fridge to partake of in so many different, delicious ways. I only wish we'd thought of this earlier!
More to come soon, fellow foodies, and don't forget that we still offer gift certificates for those who have dessertaholics in their families, which means that you can purchase one and give it for a special occasion, or just to brighten someone's day. (or even to use as a stocking suffer on December 24, should you be so inclined.) That way, the receiver will get to decide what delictable dessert they want to dive into, whenever they get a craving!
Ciao for now, folks...
'Da boys
Wednesday, October 29, 2008
Pazzo for Pizza!!!
Hello, all, and another Daring Bakers' Challenge is completed... Now, I didn't think we'd have ANY problems with this challenge because we make our own pizza dough all. the. time. but a Whole Wheat dough instead and our technique is different than what was required for this challenge...
First of all, we used our trusty KitchenAid to take care of all the kneading, and the instructions said that the dough should clear the sides but stick to the bottom of the bowl so that in the end, the dough should be sticky... And we were all good until the next day when it was time to work with the dough again...
We prepped the dough as instructed, flattening them to a 5 inch-ish circle and letting them rest for 2 hours under cover of plastic wrap... and then came the REAL challenge, and we SO wanted to video this part for our own amusement and yours! We were supposed to toss the dough like a pizzaiolo, BUT! -----
My hands were floured all over but the dough was just too wet and when I placed it on my hands it just stretched and ripped... I re-rooled the dough in a little more flour and tried again, but it just kept ripping, so there are no photos or video of this... We ended up just shaping the dough by hand on the board like we've always done...
Then on to the toppings!!! For the first, we topped it with our favorite jarred marinara from Food Emporium, then turkey pepperoni, a combination of soy cheddar and soy jalapeno cheeses, some cooked chicken, and finally a little more cheese... For the second, I wanted to try a simple margherita with the same sauce as before, and then soy mozzarella and fresh basil...
These baked up SOOOOOOO nicely in such a hot oven and in SUCH a short time, too!!! We finished too late to try them fresh out of the oven, but they were still yummy warmed for lunch today... All in all a great, not-as-simple-as-you'd-expect challenge, but the end result was just as delicious! and NOW, the photos...


First of all, we used our trusty KitchenAid to take care of all the kneading, and the instructions said that the dough should clear the sides but stick to the bottom of the bowl so that in the end, the dough should be sticky... And we were all good until the next day when it was time to work with the dough again...
We prepped the dough as instructed, flattening them to a 5 inch-ish circle and letting them rest for 2 hours under cover of plastic wrap... and then came the REAL challenge, and we SO wanted to video this part for our own amusement and yours! We were supposed to toss the dough like a pizzaiolo, BUT! -----
My hands were floured all over but the dough was just too wet and when I placed it on my hands it just stretched and ripped... I re-rooled the dough in a little more flour and tried again, but it just kept ripping, so there are no photos or video of this... We ended up just shaping the dough by hand on the board like we've always done...
Then on to the toppings!!! For the first, we topped it with our favorite jarred marinara from Food Emporium, then turkey pepperoni, a combination of soy cheddar and soy jalapeno cheeses, some cooked chicken, and finally a little more cheese... For the second, I wanted to try a simple margherita with the same sauce as before, and then soy mozzarella and fresh basil...
These baked up SOOOOOOO nicely in such a hot oven and in SUCH a short time, too!!! We finished too late to try them fresh out of the oven, but they were still yummy warmed for lunch today... All in all a great, not-as-simple-as-you'd-expect challenge, but the end result was just as delicious! and NOW, the photos...
Thursday, October 23, 2008
Caramel apples, pumpkins, and cranberries...
John Greenleaf Whittier is quoted as saying: "Ah! on Thanksgiving day... What moistens the lip and what brightens the eye? What calls back the past, like the rich Pumpkin pie?"
We're gearing up for the holiday season, ready to provide the most mouth-watering Pumpkin pie with cinnamon pecan struesel. It's a true delight and we can't wait to get your feedback (and that of your family and friends) when they sink their forks into a slice (warm from the oven? slathered with whipped cream? or ICE CREAM, perhaps???). You'll see smiles of delight and eyes will roll back in their heads. (this is not a horror film - it is, as Martha says, A good thing.)
And I forgot to mention two other great holiday favorites - Pumpkin cheesecake with cranberry orange biscotti crust, and Caramel Apple cheesecake with tuscan spice biscotti crust. These will leave you begging for more, believe me!
Last week on an episode of Eli Stone (one of my favorite new shows of the fall season) A character was reminiscing over a concert he'd attended, where he'd had an almost spiritual experience. I quote (once again): "I could taste magic, speak art, and listen to the turning of the universe". Isn't this what food, family and friendship is all about? And what better time to experience it all than over a slice of pie, a cup of chocolate toffee bread pudding, or a mouthful of Brooklyn blackout cake?. Get your name on the list, folks, these holiday splendors won't last all year, 'cause come spring, we'll be back to the rich flavors of berries, citrus, honey and such. Take time during these chilly months to really savor the flavors of the season: Nutmeg, cinnamon, cloves, mouthwatering flaky pastry and just about anything you can imagine in chocolate.
Call today to place your orders, (please try to give us at least 48 hours' notice, we want all of you to be satisfied!), and get those forks polished, the napkins folded, and the appetites ready for a trip to Joey Biscotti heaven!
Ciao for now -
'Da boys
We're gearing up for the holiday season, ready to provide the most mouth-watering Pumpkin pie with cinnamon pecan struesel. It's a true delight and we can't wait to get your feedback (and that of your family and friends) when they sink their forks into a slice (warm from the oven? slathered with whipped cream? or ICE CREAM, perhaps???). You'll see smiles of delight and eyes will roll back in their heads. (this is not a horror film - it is, as Martha says, A good thing.)
And I forgot to mention two other great holiday favorites - Pumpkin cheesecake with cranberry orange biscotti crust, and Caramel Apple cheesecake with tuscan spice biscotti crust. These will leave you begging for more, believe me!
Last week on an episode of Eli Stone (one of my favorite new shows of the fall season) A character was reminiscing over a concert he'd attended, where he'd had an almost spiritual experience. I quote (once again): "I could taste magic, speak art, and listen to the turning of the universe". Isn't this what food, family and friendship is all about? And what better time to experience it all than over a slice of pie, a cup of chocolate toffee bread pudding, or a mouthful of Brooklyn blackout cake?. Get your name on the list, folks, these holiday splendors won't last all year, 'cause come spring, we'll be back to the rich flavors of berries, citrus, honey and such. Take time during these chilly months to really savor the flavors of the season: Nutmeg, cinnamon, cloves, mouthwatering flaky pastry and just about anything you can imagine in chocolate.
Call today to place your orders, (please try to give us at least 48 hours' notice, we want all of you to be satisfied!), and get those forks polished, the napkins folded, and the appetites ready for a trip to Joey Biscotti heaven!
Ciao for now -
'Da boys
Subscribe to:
Posts (Atom)