


Hello friends! Once again, life became so full that we haven't had a chance to blog in forever, it seems. We took the month of July off to visit relatives, spending a great weekend in Ft. Myers with my mom and then about 8 days camping with Joe's family at Mt. Shasta CA. It was a much needed respite, and now that we are refreshed and full of good family memories to see us through, we came back and decided to dive back into the business, even though the summer months are the slowest as far as taking our product to Market. The heat and humidity in Florida are keeping customers away, locked safely in their air-conditioned homes or movie theatres, I suppose. And thats OK, because it gives us time to think about what to bring out this fall!
I baked a sinfully delicious Peanut Butter/Chocolate bundt cake with Salted Caramel glaze this past week and it was really naughty of me not to share... but I was intoxicated, I suppose. We will bring that to market this fall to sell either in slice form or perhaps small "bundts for two".
Of course, our best sellers will be back - Apple spice cake, Pumpkin pie with cinnamon pecan streusal, and many others. If our best friends from South Orange don't make it down in September as we hope they will, then we'll be at the Sabor Festival in Ybor with Tres Leches cakes (we should call them hotcakes, because that's how well they sell!)..and our Fiesta brownies with a hint of cayenne pepper, among other latin inspired goodies.
As usual, we're at the Ybor City Saturday Market from 9-1 each Saturday, with longer hours beginning in late September. Look for the Tiffany Blue booth that's overflowing with Chocolate, Citrus, and other sweet fresh fruits and creamy toppings... we promise you won't leave hungry!
Ciao for now -
'Da Boys
Monday, August 9, 2010
Friday, February 12, 2010
Oh Sugar, Why must you taunt me so?
Hi - remember me? (us?)...it's been SO long since we blogged. Many changes in our lives, many new friends, new dishes to serve up and so much more. Joe and I moved to St. Petersburg Florida a few months back and we are so much more relaxed on the homefront. Producing for market has been a challange, but with so many merits, it really is worth all the lost sleep and tension.
We have two really great room-mates (a sure sign of the times, due to this indiscribable economy we're experiencing), a cute little attention-craving pup named Poco, and our Jeep (Eli) to get us from point A to Z and back again each day.
Tomorrow morning we're taking our delicious Bittersweet Chocolate Cherry Ganache-covered brownies, heart shaped for the holiday, to market, along with some new Strawberry bread (filled with fresh strawberries and walnuts), and a few White Chocolate Raspberry swirl Cheesecakes for lovers lucky enough to find us in Ybor City. (if you're lucky enough to live in South West Florida - come find us on Saturdays in Ybor between 9am and 3pm for some of the finest sweet treats you can imagine - remember, we make Momma's desserts with a gourmet twist!)
I'm currently working with a great group of people at Tampa's new Crate and Barrel store, and after making it through the holidays as a seasonal sales person, I am now a permanent part-timer and was blessed to receive the Employee of the Quarter designation - and all because of the great group of co-workers who voted for me. It was a truly wonderful surprise, and truly made me feel like I belong.
If you know any SW Florida couples getting married in the near future, send them to Crate and Barrel to sign up for our Sunday morning Bridal Events - three left in the month of February, and Joey Biscotti is supplying the sweets! Each bride and groom will be given the opportunity to register at the store, taste some great treats, have a Mimosa and enjoy some personalized attention from the C&B staff.
More to come as time warrents!
Ciao for now -
Steven and Joe -
'Da Boys
Monday, December 28, 2009
Long time, no taste!


Hello fellow sweets lovers - well, its been months since I last blogged, and for good reason - we've been busy beavers here at Joey Biscotti - baking our little fingers off to bring you the finest in delicious delectables. I'm attaching a pic or two of our booth at the Ybor Saturday Market (corner of 19th and 8th - Centennial Park in Ybor City) and a recent Nutcracker holiday event to show you what we've been up to. We have, for some odd reason, become "those cookie guys" at the market - people come back week after week for our Snickerdoodles, Lemon White/Chocolate cookies, Oatmeal with Cranberries and white chocolate, and so much more. And we're starting to do wedding cakes (our first is in a few weeks - wish us luck!) But as I've told my brides-to-be, we don't do much in the way of fancy decorations. Our stuff is all about flavor over looks, with a rustic, home-baked feel and look to them. The brides we've been dealing with seem to be in agreement - Taste wins over fondant and flowers, so bring on the wedding cake orders!
Here's hoping that you all have a wonderful and prosperous New Year, and please stop by and see us at Market, so we may fulfill all your sweets cravings in a timely fashion!
Ciao for now -
'Da boys
Tuesday, October 27, 2009
Ever-growing fan base!
We've received another great fan letter from our patrons at the Ybor Market and I want to share it with you here. I am so thrilled that we are getting such great feedback - it continues to reinforce in our minds that we are doing something right! We're moving this week, so I'll keep this post short - but I hope you get from this that, if you haven't been to the market and/or tasted our goods - you are really missing out on something special!
Here's the letter:
Guys;
We met you for the first time last Saturday at the market. We picked up some Mutts, the Apple Cake, a Lemon, Blueberry Muffin. My partners name was Steve also.
Anyway. We were and still are most impressed. I have to agree with another observer. Everything out there these days is so cookie cutter run of the mill stuff. Even the new Publix gourmet items are nice, but so mass produced feeling.
I cannot even begin to think what those Cakes and cheese cakes would be like. I am a CAKE FREAK!!! Steve is the same with Cheese Cake. Once the weather cools, please consider bringing some of these with you to the market. The Malt Ball one sounds so dreamy. The bread pudding!! OMG, did you have any with you last week?? I know the market is closed this week due to the holiday, will you all be set up the weekend of the 7th??
Anyway, the best of luck to you and your business and hope to see you all soon
Regards;
(withheld for privacy) - Tampa. FL
Yea! Go US! Whoo Hoo!
Ciao for now -
'Da boys
Sunday, October 25, 2009
Learn something new every day...
Today I met some really wonderful folks: the owners/bakers of Millie's Gourmet Biscotti.
They're lovely folks, and they make some of the best biscotti I've ever tasted.
They were kind enough to let me sample their Lemon Blueberry White Chocolate biscotti, and it was to live for!
Now, as many of you know, we started out baking biscotti, which led us into a whole new world of Dessert possibilities. Baking biscotti us a true art form, and when we relocated to Florida, we were suddenly dealing with HUMIDITY! It really killed our recipes, and so we decided to concentrate on things we had more control over. Now we've become known for our cookies, muffins and cakes, etc; If we' d had the fore-sight, we could have changed our name to
Joey Everything BUT Biscotti!!
So I want to strongly recommend to all of you biscotti lovers, to head over to
www.MilliesGourmetBiscotti.com, and buy some of the finest biscotti around!
Ciao for now -
'Da Boys
Tuesday, September 29, 2009
So, I had my eyes examined today, and it turns out that I DID need new reading glasses. Perhap our recipes will turn out even BETTER, since I'll be able to see the proper quantities to measure out!! I highly recommend taking care of your eyesight ( not to mention the rest of yourself! ), so that you may correctly witness this beautiful world we live in.
Joe and I are looking for new "diggs", and took a drive through St. Petersburgh today. What a pretty city. We'd love feedback from anyone who has lived or currently lives there. The kitchen we produce our culinary magic in is located in Largo, and is currently a 33 mile drive each way... Talk about time and mileage! So we're hoping to get a little closer to both the kitchen and his job. Other suggestions are greatly appreciated.
Stop by the Ybor market this Saturday, 10/3, and pick up some Joeltz, cookies, and fresh Pumpkin Cream Cheese Swirl muffins. Fall is officialy here!
Ciao for now -
'Da Boys
Tuesday, September 15, 2009
Affirmations are a Sweet Blessing!
Hello friends and family. Today Joe and I received a wonderful email from someone who had purchased from our booth at the Ybor Saturday Market. It made us both practically speechless (and if you know me - you know just how difficult THAT is!). I'm not going to say a lot about it, other than that it is a glorious reminder to us that following our bliss, living with passion and baking love into everything we make is what it's all about. Here, in it's entirety, is the letter:
"Hey Guys,
My wife and I stopped by your table at the Ybor Market and bought a couple of your delicious sweets and thought I'd let you know that they were awesome. We got the "Tres Leches" and those mini-cupcakes with the spicy kick (not sure what they're called so I make up my own name). My wife is not usually a fan of "Tres Leches" but me being Hispanic happen to love it so I got it anyway. My wife loved it! The mini-cupcakes with the spicy kick may be one of the most delicious sweets that I've ever had. We only bought 4 and once we finished those we almost turned back to by a bunch more but it was after 1pm.
You have a great product. Living in Brandon, it seems that everything around here is a cookie-cutter chain so we had to go all the way to Ybor to find a worthwhile product and happened to run into a unique product made by people from Brandon... ironic. I wish you the best of luck and hope to be able to buy more of your products.
(I'm keeping his name anonymous)
Aspiring Food Snob"
Ciao for now, Good people...
'Da Boys
Sunday, August 23, 2009
To Market we go!
Wow! I cannot believe how long it has been since I have had a chance to post on our blog - and though I apologize to all of our loyal friends and fans, I must admit that the time away has been spent wisely. As many of you know, we are now fully licensed to sell in the state of Florida. We've made some wonderful contacts here, beginning with Cindy Howell of Your Pro Kitchen, a lovely young woman who is such a cheerleader for our cause. Having been an entrepreneur herself, she knows the trials and tribulations of getting a business up and on it's feet, so she now believes in giving back to the universe and sharing that knowledge with first-time business start-ups. Now THAT'S my kind of gal!
Her breadth of experience inside the industry has led us to everything from proper packaging and labeling techniques, to who and how to to contact the right individuals to get ourselves fully licensed under the law.
Her Kitchen rental space is gorgeous - 2000 square feet of baking heaven. Huge, fully functioning convection ovens, tons of counter space and equipment we have always dreamed of using, and the guidance to go with it all. I've said it before and I'll say it again: we are blessed.
Shortly after meeting Cindy and getting set up in her kitchen, we met Lynn Schultz, who works for the SBIC of Hillsborough County, and manages the Ybor Saturday Market in Ybor City. Another wonderful, friendly and very giving contact for us - and she has taught us so much. She believes in us and our product, and has given us a prime space at the market so that we may be seen by all who enter the grounds. We did 50% better business in this, our second weekend at the market, and we know it will just continue to grow from there.
For those of you who missed our goodies this weekend, let me make your mouth water, if I may. We sold Apple Spice muffins, filled with cranberries and brown sugar (one of my all-time favorite recipes), Citrus pound cakes, Chocolate/Toffee Bread Puddings, and our famous Mutts: chocolate cookies which house every kind of chip you could want, including butterscotch, white chocolate, semi-sweet chocolate, peanut butter, and toffee...YUM.
We had a blast giving out samples and hooking people on our goods (this may sound a bit crass to some, but at my former place of employment, some people - and you know who you are! - were convinced that we put crack cocaine in our stuff to get people addicted! LOL! Well, we DON'T. We just fill them with love. That is why people keep coming back for more.
I hope that everyone who has followed our posts, tasted our goods and/or simply believe in us and love watching our growth, will appreciate what we've been doing to be able to continue bringing cake to the people! (not to mention cheesecake, tarts, pies, brownies, cookies, ...well - you know the drill!)
Thank you for continuing to believe in us. We will try to be better about keeping our blog up-dated from this point forward, but if we seem to lag a bit, be sure that it is because we are using our time wisely to get our name out there and to keep on perfecting recipes we know you all will love.
Ciao for now...
'Da boys
Monday, July 27, 2009
Homemade is better!!!
The July Daring Bakers' challenge was hosted by Nicole at Sweet Tooth. She chose Chocolate Covered Marshmallow Cookies and Milan Cookies from pastry chef Gale Gand of the Food Network.
If you are satisfied with store-bought marshmallows or Fluff, you don't know WHAT you're missing!!! Who knew marshmallows were so easy to make!!! Here is the recipe as given by our July hostess...
Homemade marshmallows:
• 1/4 cup water
• 1/4 cup light corn syrup
• 3/4 cup (168.76 grams/5.95oz) sugar
• 1 tablespoon powdered gelatin
• 2 tablespoons cold water
• 2 egg whites , room temperature
• 1/4 teaspoon pure vanilla extract
1. In a saucepan, combine the water, corn syrup, and sugar, bring to a boil until “soft-ball” stage, or 235 degrees on a candy thermometer.
2. Sprinkle the gelatin over the cold water and let dissolve.
3. Remove the syrup from the heat, add the gelatin, and mix.
4. Whip the whites until soft peaks form and pour the syrup into the whites.
5. Add the vanilla and continue whipping until stiff.
6. Transfer to a pastry bag.
This is what it looks like after step 5...

I wasn't too sure about the part of the challenge about the cookie base... It suggested making the cookies 1 to 1 1/2 inches in diameter which seemed a little small to me, but I went ahead and made the cookies with the recipe given...
Prep Time: 10 min
Inactive Prep Time: 5 min
Cook Time: 10 min
Serves: about 2 dozen cookies
• 3 cups (375grams/13.23oz) all purpose flour
• 1/2 cup (112.5grams/3.97oz) white sugar
• 1/2 teaspoon salt
• 3/4 teaspoon baking powder
• 3/8 teaspoon baking soda
• 1/2 teaspoon ground cinnamon
• 12 tablespoons (170grams/ 6 oz) unsalted butter
• 3 eggs, whisked together
• Homemade marshmallows, recipe follows
• Chocolate glaze, recipe follows
1. In a mixer with the paddle attachment, blend the dry ingredients.
2. On low speed, add the butter and mix until sandy.
3. Add the eggs and mix until combine.
4. Form the dough into a disk, wrap with clingfilm or parchment and refrigerate at least 1 hour and up to 3 days.
5. When ready to bake, grease a cookie sheet or line it with parchment paper or a silicon mat.
6. Preheat the oven to 375 degrees F.
7. Roll out the dough to 1/8-inch thickness, on a lightly floured surface. Use a 1 to 1 1/2 inches cookie cutter to cut out small rounds of dough.
8. Transfer to the prepared pan and bake for 10 minutes or until light golden brown. Let cool to room temperature.
Now, I made these with a 1 inch cutter, and got 60 cookies out of the first rolling alone... I probably could have gotten another 2 dozen out of the leftover, but something told me to stop with the 60, and a good thing I did because the marshmallow recipe was JUST ENOUGH...
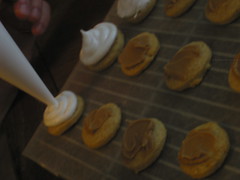
Assembling the cookies was not a problem either... We decided to give them a little flavor boost so I spread a little peanut butter on 2 dozen and a little raspberry fruit spread on another 2 dozen, leaving the last dozen plain... Steven got the job of piping the marshmallow on to the cookies...
This is the peanut butter group...
This is the raspberry group...
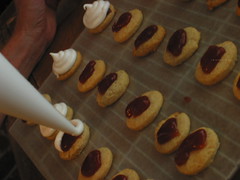
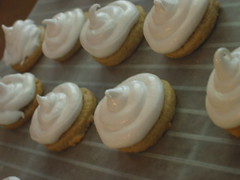
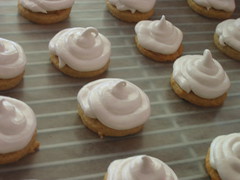
And this is the final step before the chocolate coating... Here, they need to dry for at least 2 hours...
While the mallomars were drying, I began the second part of the challenge... Homemade orange milanos... Recipe here...
Milan Cookies
Recipe courtesy Gale Gand, from Food Network website
Prep Time: 20 min
Inactive Prep Time: 0 min
Cook Time: 1 hr 0 min
Serves: about 3 dozen cookies
• 12 tablespoons (170grams/ 6 oz) unsalted butter, softened
• 2 1/2 cups (312.5 grams/ 11.02 oz) powdered sugar
• 7/8 cup egg whites (from about 6 eggs)
• 2 tablespoons vanilla extract
• 2 tablespoons lemon extract
• 1 1/2 cups (187.5grams/ 6.61 oz) all purpose flour
• Cookie filling, recipe follows
Cookie filling:
• 1/2 cup heavy cream
• 8 ounces semisweet chocolate, chopped
• 1 orange, zested
1. In a mixer with paddle attachment cream the butter and the sugar.
2. Add the egg whites gradually and then mix in the vanilla and lemon extracts.
3. Add the flour and mix until just well mixed.
4. With a small (1/4-inch) plain tip, pipe 1-inch sections of batter onto a parchment-lined sheet pan, spacing them 2 inches apart as they spread.
5. Bake in a preheated 350 degree oven for 10 minutes or until light golden brown around the edges. Let cool on the pan.
6. While waiting for the cookies to cool, in a small saucepan over medium flame, scald cream.
7. Pour hot cream over chocolate in a bowl, whisk to melt chocolate, add zest and blend well.
8. Set aside to cool (the mixture will thicken as it cools).
9. Spread a thin amount of the filling onto the flat side of a cookie while the filling is still soft and press the flat side of a second cookie on top.
10. Repeat with the remainder of the cookies.
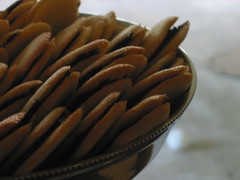
Again, I was a little iffy about the 1-inch length, and here, my iffiness was confirmed because the cookies baked a little small for my taste, so for the rest of the batches, we made them larger... The other issue we had was the Florida humidity... The cookies didn't crisp up like I had expected them to... But other than that, this was a success as well...
Look at them all!!!
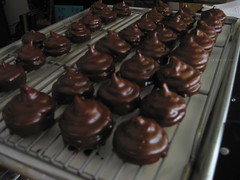
Meanwhile, back at the mallomars, they received their bittersweet chocolate cloaking, and held their shape beautifully!!!
Chocolate glaze:
• 12 ounces semisweet chocolate
• 2 ounces cocoa butter or vegetable oil
1. Melt the 2 ingredients together in the top of a double boiler or a bowl set over barely simmering water.
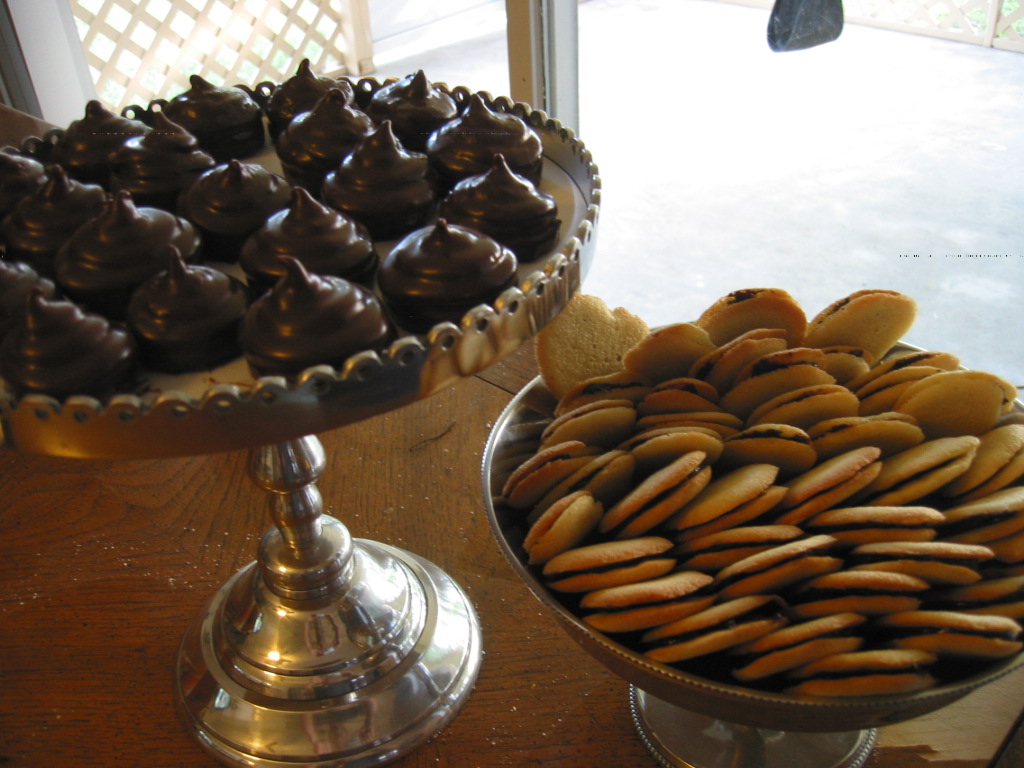
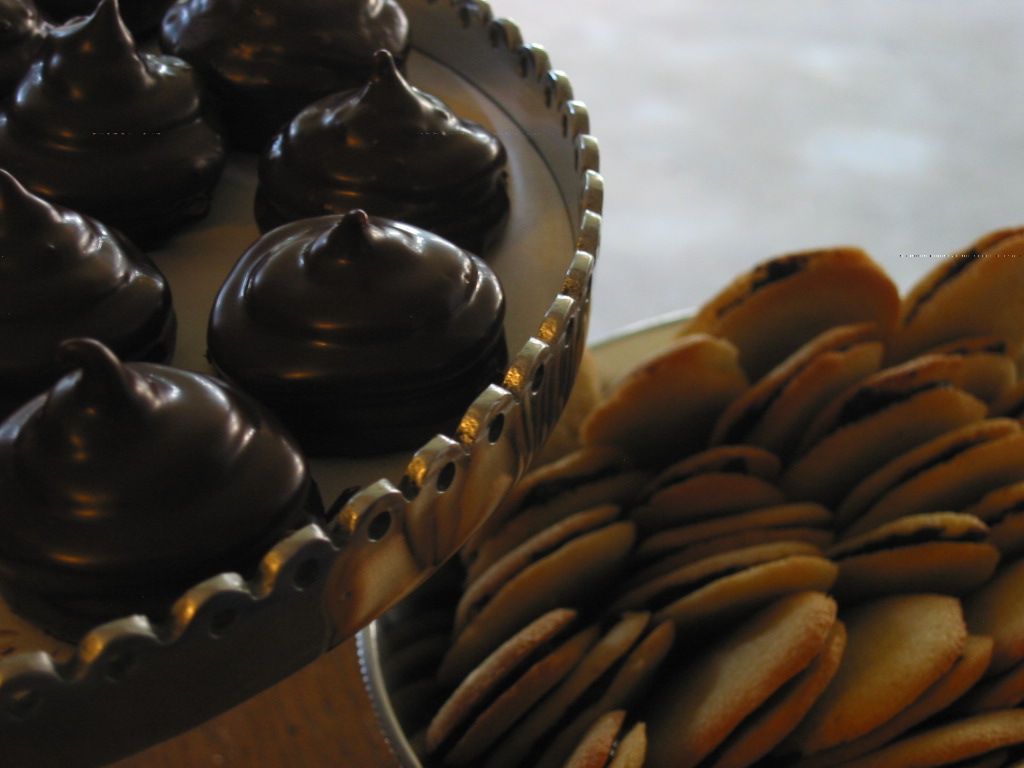
All in all, a great challenge met with great enthusiasm... A final look!!!
Looking forward to what August has in store!!!
And remember to follow us on Twitter @joeybiscotti
If you are satisfied with store-bought marshmallows or Fluff, you don't know WHAT you're missing!!! Who knew marshmallows were so easy to make!!! Here is the recipe as given by our July hostess...
Homemade marshmallows:
• 1/4 cup water
• 1/4 cup light corn syrup
• 3/4 cup (168.76 grams/5.95oz) sugar
• 1 tablespoon powdered gelatin
• 2 tablespoons cold water
• 2 egg whites , room temperature
• 1/4 teaspoon pure vanilla extract
1. In a saucepan, combine the water, corn syrup, and sugar, bring to a boil until “soft-ball” stage, or 235 degrees on a candy thermometer.
2. Sprinkle the gelatin over the cold water and let dissolve.
3. Remove the syrup from the heat, add the gelatin, and mix.
4. Whip the whites until soft peaks form and pour the syrup into the whites.
5. Add the vanilla and continue whipping until stiff.
6. Transfer to a pastry bag.
This is what it looks like after step 5...
I wasn't too sure about the part of the challenge about the cookie base... It suggested making the cookies 1 to 1 1/2 inches in diameter which seemed a little small to me, but I went ahead and made the cookies with the recipe given...
Prep Time: 10 min
Inactive Prep Time: 5 min
Cook Time: 10 min
Serves: about 2 dozen cookies
• 3 cups (375grams/13.23oz) all purpose flour
• 1/2 cup (112.5grams/3.97oz) white sugar
• 1/2 teaspoon salt
• 3/4 teaspoon baking powder
• 3/8 teaspoon baking soda
• 1/2 teaspoon ground cinnamon
• 12 tablespoons (170grams/ 6 oz) unsalted butter
• 3 eggs, whisked together
• Homemade marshmallows, recipe follows
• Chocolate glaze, recipe follows
1. In a mixer with the paddle attachment, blend the dry ingredients.
2. On low speed, add the butter and mix until sandy.
3. Add the eggs and mix until combine.
4. Form the dough into a disk, wrap with clingfilm or parchment and refrigerate at least 1 hour and up to 3 days.
5. When ready to bake, grease a cookie sheet or line it with parchment paper or a silicon mat.
6. Preheat the oven to 375 degrees F.
7. Roll out the dough to 1/8-inch thickness, on a lightly floured surface. Use a 1 to 1 1/2 inches cookie cutter to cut out small rounds of dough.
8. Transfer to the prepared pan and bake for 10 minutes or until light golden brown. Let cool to room temperature.
Now, I made these with a 1 inch cutter, and got 60 cookies out of the first rolling alone... I probably could have gotten another 2 dozen out of the leftover, but something told me to stop with the 60, and a good thing I did because the marshmallow recipe was JUST ENOUGH...
Assembling the cookies was not a problem either... We decided to give them a little flavor boost so I spread a little peanut butter on 2 dozen and a little raspberry fruit spread on another 2 dozen, leaving the last dozen plain... Steven got the job of piping the marshmallow on to the cookies...
This is the peanut butter group...
This is the raspberry group...
And this is the final step before the chocolate coating... Here, they need to dry for at least 2 hours...
While the mallomars were drying, I began the second part of the challenge... Homemade orange milanos... Recipe here...
Milan Cookies
Recipe courtesy Gale Gand, from Food Network website
Prep Time: 20 min
Inactive Prep Time: 0 min
Cook Time: 1 hr 0 min
Serves: about 3 dozen cookies
• 12 tablespoons (170grams/ 6 oz) unsalted butter, softened
• 2 1/2 cups (312.5 grams/ 11.02 oz) powdered sugar
• 7/8 cup egg whites (from about 6 eggs)
• 2 tablespoons vanilla extract
• 2 tablespoons lemon extract
• 1 1/2 cups (187.5grams/ 6.61 oz) all purpose flour
• Cookie filling, recipe follows
Cookie filling:
• 1/2 cup heavy cream
• 8 ounces semisweet chocolate, chopped
• 1 orange, zested
1. In a mixer with paddle attachment cream the butter and the sugar.
2. Add the egg whites gradually and then mix in the vanilla and lemon extracts.
3. Add the flour and mix until just well mixed.
4. With a small (1/4-inch) plain tip, pipe 1-inch sections of batter onto a parchment-lined sheet pan, spacing them 2 inches apart as they spread.
5. Bake in a preheated 350 degree oven for 10 minutes or until light golden brown around the edges. Let cool on the pan.
6. While waiting for the cookies to cool, in a small saucepan over medium flame, scald cream.
7. Pour hot cream over chocolate in a bowl, whisk to melt chocolate, add zest and blend well.
8. Set aside to cool (the mixture will thicken as it cools).
9. Spread a thin amount of the filling onto the flat side of a cookie while the filling is still soft and press the flat side of a second cookie on top.
10. Repeat with the remainder of the cookies.
Again, I was a little iffy about the 1-inch length, and here, my iffiness was confirmed because the cookies baked a little small for my taste, so for the rest of the batches, we made them larger... The other issue we had was the Florida humidity... The cookies didn't crisp up like I had expected them to... But other than that, this was a success as well...
Look at them all!!!
Meanwhile, back at the mallomars, they received their bittersweet chocolate cloaking, and held their shape beautifully!!!
Chocolate glaze:
• 12 ounces semisweet chocolate
• 2 ounces cocoa butter or vegetable oil
1. Melt the 2 ingredients together in the top of a double boiler or a bowl set over barely simmering water.
All in all, a great challenge met with great enthusiasm... A final look!!!
Looking forward to what August has in store!!!
And remember to follow us on Twitter @joeybiscotti
Tuesday, June 30, 2009
And I say to myself: "What a wonderful world..."
Well, good friends, the adjustment period is winding down, and I'm getting closer to feeling like I'm not on vacation any more. We've made a few great contacts for the business, and this weekend I'm taking my goods to a local salon for the clientele to much on between shampoos and pedicures. This place supplies wine and snacks all the time, and I thought: what better way to get the word out about Joey Biscotti!
I'm considering making a few different things - Joeltz hazelnut brownies (never met a brownie I didn't like) mini bite-sized lemon cupcakes filled with lemon curd, and either some type of cookie or our famous Heart shaped double chocolate brownies with raspberry chips, chocolate ganache, and a drizzle of red chocolate on top - a REAL crowd-pleaser.
Florida has offered us a few challenges, as far as baking goes. For instance, we've had to go back to the drawing board in regards to our biscotti. The humidity causes them to come out completely differently than they did in New York City, so I've got some recipe tinkering to do and in the meantime I've taken them off our menu - no sense teasing people with something they can't order from us at the moment. (Call me a stickler, but I just won't sell someone something that I wouldn't eat, myself, and I believe that's the sign of a good business man.)
Otherwise, the weather is beautiful - the sunsets on the west coast of florida are some of the most beautiful I've ever seen. Talk about raspberry...thats the color of the sky just before the last rays of the sun sink into the horizon. Amazing!
Stay well, stay hungry - and keep on checking back for additions to our menu - who knows what this climate might inspire us to create next!
Ciao for now -
'Da boys
Saturday, June 27, 2009
Loose Woman or Delicious Pastry???
The June Daring Bakers' challenge was hosted by Jasmine of Confessions of a Cardamom Addict and Annemarie of Ambrosia and Nectar. They chose a Traditional (UK) Bakewell Tart... er... pudding that was inspired by a rich baking history dating back to the 1800's in England.
Wanna know more about the history of the Bakewell Tart??? Read here... Very interesting, especially the tasty-sounding Cherry Bakewell Shot!!!
It seems every month, we intend to take care of the challenge earlier rather than later, and yet we never seem to until the very last minute... This month was no exception... But we completed it on time!!! And without any major problems...
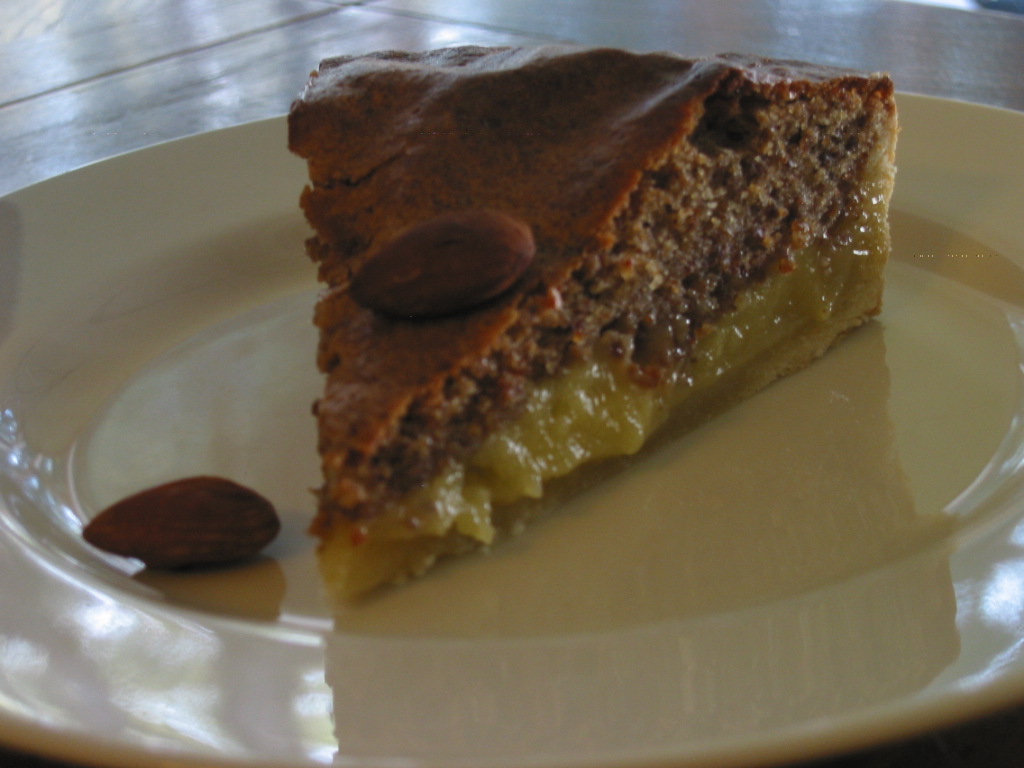
The shortcrust pastry came together quite well, as did the frangipane... We decided on our own world famous Joey Biscotti Lemon Curd as the fruit layer... We already had some made so we figured, why not? I only really had a small issue, as I always do, with the ground almonds... I never seem to be able to get them ground fine enough and end up with larger chunks in the mix...
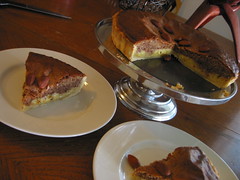
All in all, it was a great, tasty challenge... I would love to experiment with other fruits at some point... And now, the photos!!! (the recipe follows)...

Bakewell Tart…er…pudding
Makes one 23cm (9” tart)
Prep time: less than 10 minutes (plus time for the individual elements)
Resting time: 15 minutes
Baking time: 30 minutes
Equipment needed: 23cm (9”) tart pan or pie tin (preferably with ridged edges), rolling pin
One quantity sweet shortcrust pastry (recipe follows)
Bench flour
250ml (1cup (8 US fl. oz)) jam or curd, warmed for spreadability
One quantity frangipane (recipe follows)
One handful blanched, flaked almonds
Assembling the tart
Place the chilled dough disc on a lightly floured surface. If it's overly cold, you will need to let it become acclimatised for about 15 minutes before you roll it out. Flour the rolling pin and roll the pastry to 5mm (1/4”) thickness, by rolling in one direction only (start from the centre and roll away from you), and turning the disc a quarter turn after each roll. When the pastry is to the desired size and thickness, transfer it to the tart pan, press in and trim the excess dough. Patch any holes, fissures or tears with trimmed bits. Chill in the freezer for 15 minutes.
Preheat oven to 200C/400F.
Remove shell from freezer, spread as even a layer as you can of jam onto the pastry base. Top with frangipane, spreading to cover the entire surface of the tart. Smooth the top and pop into the oven for 30 minutes. Five minutes before the tart is done, the top will be poofy and brownish. Remove from oven and strew flaked almonds on top and return to the heat for the last five minutes of baking.
The finished tart will have a golden crust and the frangipane will be tanned, poofy and a bit spongy-looking. Remove from the oven and cool on the counter. Serve warm, with crème fraîche, whipped cream or custard sauce if you wish.
When you slice into the tart, the almond paste will be firm, but slightly squidgy and the crust should be crisp but not tough.
Jasmine’s notes:
• If you cannot have nuts, you can try substituting Victoria sponge for the frangipane. It's a pretty popular popular cake, so you shouldn't have any troubles finding one in one of your cookbooks or through a Google search. That said, our dear Natalie at Gluten a Go Go has sourced some recipes and linked to them in the related alt.db thread.
• You can use whichever jam you wish, but if you choose something with a lot of seeds, such as raspberry or blackberry, you should sieve them out.
• The jam quantity can be anywhere from 60ml (1/4 cup) to 250ml (1cup), depending upon how “damp” and strongly flavoured your preserves are. I made it with the lesser quantity of home made strawberry jam, while Annemarie made it with the greater quantity of cherry jam; we both had fabulous results. If in doubt, just split the difference and spread 150ml (2/3cup) on the crust.
Annemarie’s notes:
• The excess shortcrust can be rolled out and cut into cookie-shapes (heck, it’s pretty darned close to a shortbread dough).
Sweet shortcrust pastry
Prep time: 15-20 minutes
Resting time: 30 minutes (minimum)
Equipment needed: bowls, box grater, cling film
225g (8oz) all purpose flour
30g (1oz) sugar
2.5ml (½ tsp) salt
110g (4oz) unsalted butter, cold (frozen is better)
2 (2) egg yolks
2.5ml (½ tsp) almond extract (optional)
15-30ml (1-2 Tbsp) cold water
Sift together flour, sugar and salt. Grate butter into the flour mixture, using the large hole-side of a box grater. Using your finger tips only, and working very quickly, rub the fat into the flour until the mixture resembles bread crumbs. Set aside.
Lightly beat the egg yolks with the almond extract (if using) and quickly mix into the flour mixture. Keep mixing while dribbling in the water, only adding enough to form a cohesive and slightly sticky dough.
Form the dough into a disc, wrap in cling and refrigerate for at least 30 minutes
Jasmine’s notes:
• I make this using vanilla salt and vanilla sugar.
• If you wish, you can substitute the seeds of one vanilla bean, one teaspoon of vanilla paste or one teaspoon of vanilla extract for the almond extract
Frangipane
Prep time: 10-15 minutes
Equipment needed: bowls, hand mixer, rubber spatula
125g (4.5oz) unsalted butter, softened
125g (4.5oz) icing sugar
3 (3) eggs
2.5ml (½ tsp) almond extract
125g (4.5oz) ground almonds
30g (1oz) all purpose flour
Cream butter and sugar together for about a minute or until the mixture is primrose in colour and very fluffy. Scrape down the side of the bowl and add the eggs, one at a time, beating well after each addition. The batter may appear to curdle. In the words of Douglas Adams: Don’t panic. Really. It’ll be fine. After all three are in, pour in the almond extract and mix for about another 30 seconds and scrape down the sides again. With the beaters on, spoon in the ground nuts and the flour. Mix well. The mixture will be soft, keep its slightly curdled look (mostly from the almonds) and retain its pallid yellow colour.
Annemarie’s notes:
• Add another five minutes or more if you're grinding your own almonds or if you're mixing by hand (Heaven help you).
Wanna know more about the history of the Bakewell Tart??? Read here... Very interesting, especially the tasty-sounding Cherry Bakewell Shot!!!
It seems every month, we intend to take care of the challenge earlier rather than later, and yet we never seem to until the very last minute... This month was no exception... But we completed it on time!!! And without any major problems...
The shortcrust pastry came together quite well, as did the frangipane... We decided on our own world famous Joey Biscotti Lemon Curd as the fruit layer... We already had some made so we figured, why not? I only really had a small issue, as I always do, with the ground almonds... I never seem to be able to get them ground fine enough and end up with larger chunks in the mix...
All in all, it was a great, tasty challenge... I would love to experiment with other fruits at some point... And now, the photos!!! (the recipe follows)...
Bakewell Tart…er…pudding
Makes one 23cm (9” tart)
Prep time: less than 10 minutes (plus time for the individual elements)
Resting time: 15 minutes
Baking time: 30 minutes
Equipment needed: 23cm (9”) tart pan or pie tin (preferably with ridged edges), rolling pin
One quantity sweet shortcrust pastry (recipe follows)
Bench flour
250ml (1cup (8 US fl. oz)) jam or curd, warmed for spreadability
One quantity frangipane (recipe follows)
One handful blanched, flaked almonds
Assembling the tart
Place the chilled dough disc on a lightly floured surface. If it's overly cold, you will need to let it become acclimatised for about 15 minutes before you roll it out. Flour the rolling pin and roll the pastry to 5mm (1/4”) thickness, by rolling in one direction only (start from the centre and roll away from you), and turning the disc a quarter turn after each roll. When the pastry is to the desired size and thickness, transfer it to the tart pan, press in and trim the excess dough. Patch any holes, fissures or tears with trimmed bits. Chill in the freezer for 15 minutes.
Preheat oven to 200C/400F.
Remove shell from freezer, spread as even a layer as you can of jam onto the pastry base. Top with frangipane, spreading to cover the entire surface of the tart. Smooth the top and pop into the oven for 30 minutes. Five minutes before the tart is done, the top will be poofy and brownish. Remove from oven and strew flaked almonds on top and return to the heat for the last five minutes of baking.
The finished tart will have a golden crust and the frangipane will be tanned, poofy and a bit spongy-looking. Remove from the oven and cool on the counter. Serve warm, with crème fraîche, whipped cream or custard sauce if you wish.
When you slice into the tart, the almond paste will be firm, but slightly squidgy and the crust should be crisp but not tough.
Jasmine’s notes:
• If you cannot have nuts, you can try substituting Victoria sponge for the frangipane. It's a pretty popular popular cake, so you shouldn't have any troubles finding one in one of your cookbooks or through a Google search. That said, our dear Natalie at Gluten a Go Go has sourced some recipes and linked to them in the related alt.db thread.
• You can use whichever jam you wish, but if you choose something with a lot of seeds, such as raspberry or blackberry, you should sieve them out.
• The jam quantity can be anywhere from 60ml (1/4 cup) to 250ml (1cup), depending upon how “damp” and strongly flavoured your preserves are. I made it with the lesser quantity of home made strawberry jam, while Annemarie made it with the greater quantity of cherry jam; we both had fabulous results. If in doubt, just split the difference and spread 150ml (2/3cup) on the crust.
Annemarie’s notes:
• The excess shortcrust can be rolled out and cut into cookie-shapes (heck, it’s pretty darned close to a shortbread dough).
Sweet shortcrust pastry
Prep time: 15-20 minutes
Resting time: 30 minutes (minimum)
Equipment needed: bowls, box grater, cling film
225g (8oz) all purpose flour
30g (1oz) sugar
2.5ml (½ tsp) salt
110g (4oz) unsalted butter, cold (frozen is better)
2 (2) egg yolks
2.5ml (½ tsp) almond extract (optional)
15-30ml (1-2 Tbsp) cold water
Sift together flour, sugar and salt. Grate butter into the flour mixture, using the large hole-side of a box grater. Using your finger tips only, and working very quickly, rub the fat into the flour until the mixture resembles bread crumbs. Set aside.
Lightly beat the egg yolks with the almond extract (if using) and quickly mix into the flour mixture. Keep mixing while dribbling in the water, only adding enough to form a cohesive and slightly sticky dough.
Form the dough into a disc, wrap in cling and refrigerate for at least 30 minutes
Jasmine’s notes:
• I make this using vanilla salt and vanilla sugar.
• If you wish, you can substitute the seeds of one vanilla bean, one teaspoon of vanilla paste or one teaspoon of vanilla extract for the almond extract
Frangipane
Prep time: 10-15 minutes
Equipment needed: bowls, hand mixer, rubber spatula
125g (4.5oz) unsalted butter, softened
125g (4.5oz) icing sugar
3 (3) eggs
2.5ml (½ tsp) almond extract
125g (4.5oz) ground almonds
30g (1oz) all purpose flour
Cream butter and sugar together for about a minute or until the mixture is primrose in colour and very fluffy. Scrape down the side of the bowl and add the eggs, one at a time, beating well after each addition. The batter may appear to curdle. In the words of Douglas Adams: Don’t panic. Really. It’ll be fine. After all three are in, pour in the almond extract and mix for about another 30 seconds and scrape down the sides again. With the beaters on, spoon in the ground nuts and the flour. Mix well. The mixture will be soft, keep its slightly curdled look (mostly from the almonds) and retain its pallid yellow colour.
Annemarie’s notes:
• Add another five minutes or more if you're grinding your own almonds or if you're mixing by hand (Heaven help you).
Thursday, June 4, 2009
Can you say Vide-Greniers ??
...thats french for Community Yard Sale (or so I'm told). This saturday morning, the 6th, from 8 - 1, our neighborhood is holding just such a sale - and what better way to introduce Joey Biscotti to the unsuspecting hordes? Joe has been doing the preparations for Snickerdoodles today, while I've been baking up many a mini cheesecake, making lemon curd, and designing signs to post that will entice people into our fragrant front yard. Tomorrow will be about producing Joeltz (our caffiene-infused hazelnut brownie bites that are topped with coffee frosting and a dark chocolate covered espresso bean), sour cream chocolate cupcakes, and possibly another batch of mini cheesecakes (today was mandarin orange, tomorrow may be double chocolate).
Dontcha wish you could be there? (any Brandon/Tampa locals wanting to stop on by are welcome - just email me for directions).
Ok - back to work...
Ciao for now
'Da boys
Dontcha wish you could be there? (any Brandon/Tampa locals wanting to stop on by are welcome - just email me for directions).
Ok - back to work...
Ciao for now
'Da boys
Wednesday, May 27, 2009
That Apple Strudel is Tasty!!!
The May Daring Bakers’ challenge was hosted by Linda of make life sweeter! and Courtney of Coco Cooks. They chose Apple Strudel from the recipe book Kaffeehaus: Exquisite Desserts from the Classic Cafés of Vienna, Budapest and Prague by Rick Rodgers...
So here is the first full Daring Bakers Challenge post since we've moved to Fla-la-land... I'd always had a fear of making very thin pastry dough, thinking that it wouldn't be thin enough, or become full of holes that would be difficult to repair, or any number of other catastrophe's, but this dough, I had no problem with!!! Well, I did have one little issue... I couldn't get the dough to stretch to the correct measurements of 2' by 3' so I think I had too much filling for the size of the dough... In the end, though, the only thing that didn't seem quite right was the fact the the breadcrumbs sort of spilled out of the pastry upon slicing... Also, the only alteration I made was substituting dried cranberries for the raisins...
But, onward... first, the recipe then the photos...
Preparation time
Total: 2 hours 15 minutes – 3 hours 30 minutes
15-20 min to make dough
30-90 min to let dough rest/to prepare the filling
20-30 min to roll out and stretch dough
10 min to fill and roll dough
30 min to bake
30 min to cool
Apple strudel
from “Kaffeehaus – Exquisite Desserts from the Classic Cafés of Vienna, Budapest and Prague” by Rick Rodgers
2 tablespoons (30 ml) golden rum
3 tablespoons (45 ml) raisins
1/4 teaspoon ground cinnamon
1/3 cup plus 1 tablespoon (80 g) sugar
1/2 cup (1 stick / 115 g) unsalted butter, melted, divided
1 1/2 cups (350 ml) fresh bread crumbs
strudel dough (recipe below)
1/2 cup (120 ml, about 60 g) coarsely chopped walnuts
2 pounds (900 g) tart cooking apples, peeled, cored and cut into ¼ inch-thick slices (use apples that hold their shape during baking)
1. Mix the rum and raisins in a bowl. Mix the cinnamon and sugar in another bowl.
2. Heat 3 tablespoons of the butter in a large skillet over medium-high. Add the breadcrumbs and cook whilst stirring until golden and toasted. This will take about 3 minutes. Let it cool completely.
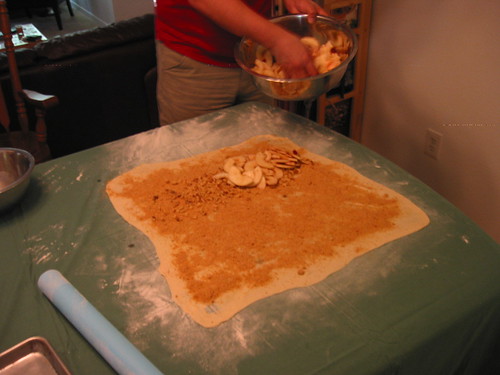
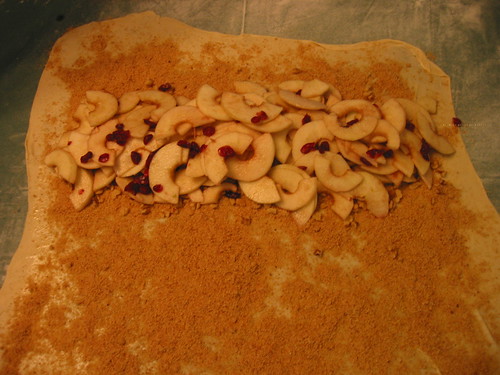
3. Put the rack in the upper third of the oven and preheat the oven to 400°F (200°C). Line a large baking sheet with baking paper (parchment paper). Make the strudel dough as described below. Spread about 3 tablespoons of the remaining melted butter over the dough using your hands (a bristle brush could tear the dough, you could use a special feather pastry brush instead of your hands). Sprinkle the buttered dough with the bread crumbs. Spread the walnuts about 3 inches (8 cm) from the short edge of the dough in a 6-inch-(15cm)-wide strip. Mix the apples with the raisins (including the rum), and the cinnamon sugar. Spread the mixture over the walnuts.
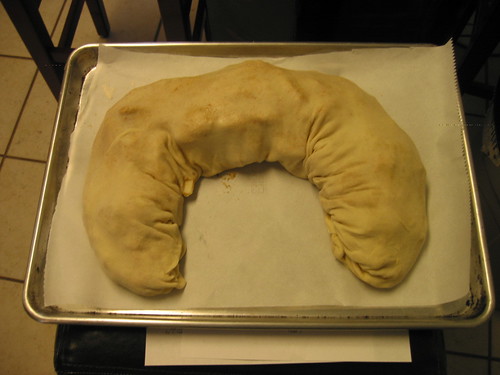
4. Fold the short end of the dough onto the filling. Lift the tablecloth at the short end of the dough so that the strudel rolls onto itself. Transfer the strudel to the prepared baking sheet by lifting it. Curve it into a horseshoe to fit. Tuck the ends under the strudel. Brush the top with the remaining melted butter.
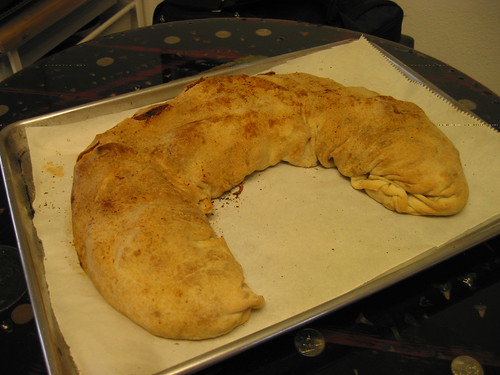
5. Bake the strudel for about 30 minutes or until it is deep golden brown. Cool for at least 30 minutes before slicing. Use a serrated knife and serve either warm or at room temperature. It is best on the day it is baked.
Strudel dough
from “Kaffeehaus – Exquisite Desserts from the Classic Cafés of Vienna, Budapest and Prague” by Rick Rodgers
1 1/3 cups (200 g) unbleached flour
1/8 teaspoon salt
7 tablespoons (105 ml) water, plus more if needed
2 tablespoons (30 ml) vegetable oil, plus additional for coating the dough
1/2 teaspoon cider vinegar
1. Combine the flour and salt in a stand-mixer fitted with the paddle attachment. Mix the water, oil and vinegar in a measuring cup. Add the water/oil mixture to the flour with the mixer on low speed. You will get a soft dough. Make sure it is not too dry, add a little more water if necessary.
Take the dough out of the mixer. Change to the dough hook. Put the dough ball back in the mixer. Let the dough knead on medium until you get a soft dough ball with a somewhat rough surface.
2. Take the dough out of the mixer and continue kneading by hand on an unfloured work surface. Knead for about 2 minutes. Pick up the dough and throw it down hard onto your working surface occasionally.
Shape the dough into a ball and transfer it to a plate. Oil the top of the dough ball lightly. Cover the ball tightly with plastic wrap. Allow to stand for 30-90 minutes (longer is better).
3. It would be best if you have a work area that you can walk around on all sides like a 36 inch (90 cm) round table or a work surface of 23 x 38 inches (60 x 100 cm). Cover your working area with table cloth, dust it with flour and rub it into the fabric. Put your dough ball in the middle and roll it out as much as you can.
Pick the dough up by holding it by an edge. This way the weight of the dough and gravity can help stretching it as it hangs. Using the back of your hands to gently stretch and pull the dough. You can use your forearms to support it.
4. The dough will become too large to hold. Put it on your work surface. Leave the thicker edge of the dough to hang over the edge of the table. Place your hands underneath the dough and stretch and pull the dough thinner using the backs of your hands. Stretch and pull the dough until it's about 2 feet (60 cm) wide and 3 feet (90 cm) long, it will be tissue-thin by this time. Cut away the thick dough around the edges with scissors. The dough is now ready to be filled.
Tips
- Ingredients are cheap so we would recommend making a double batch of the dough, that way you can practice the pulling and stretching of the dough with the first batch and if it doesn't come out like it should you can use the second batch to give it another try;
- The tablecloth can be cotton or polyster;
- Before pulling and stretching the dough, remove your jewelry from hands and wrists, and wear short-sleeves;
- To make it easier to pull the dough, you can use your hip to secure the dough against the edge of the table;
- Few small holes in the dough is not a problem as the dough will be rolled, making (most of) the holes invisible.
Both Courtney and I did a trial run on making the strudel. Below are our notes:
Courtney's notes
- She could't get it to stretch to 2 feet by 3 feet, it turned out more like 2 feet by 2 feet. But the dough was tissue thin nevertheless;
- She got some serious holes, but after rolling it wasn't noticeable;
- She used a large cheese cloth which helped manipulate and stretch the dough more than a heavier cloth would have.
Linda's notes
- I made the dough by hand, just mixed the wet ingredients into the dry ingredients with a wooden spoon. Kneaded it for about 5 min like you would bread dough. This worked as well. Haven't tried using a standmixer so I don't know how it compares.
- Instead of cider vinegar I used red wine vinegar;
- I used bread flour;
- Picking up the dough to let it stretch didn't work well for me, holes appeared pretty much instantly. Instead I stretched the dough while it was lying on the tablecloth by putting my hands underneath and stretching it out further and further;
Here's a link to a strudelmaking video that might help you a bit...
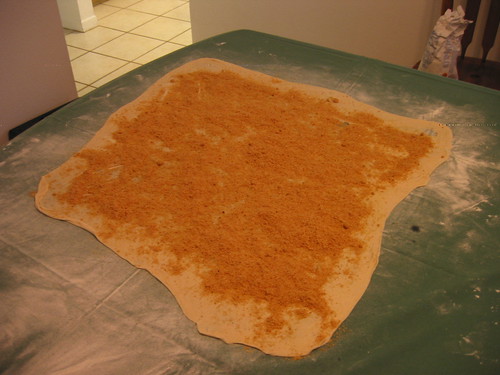
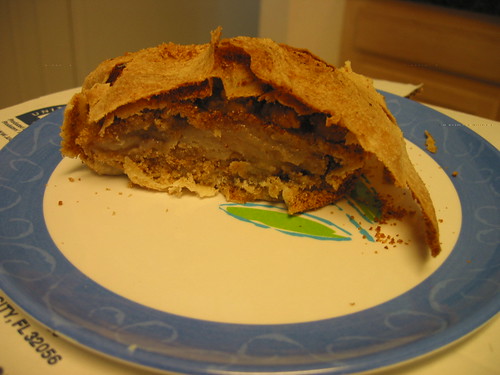

So here is the first full Daring Bakers Challenge post since we've moved to Fla-la-land... I'd always had a fear of making very thin pastry dough, thinking that it wouldn't be thin enough, or become full of holes that would be difficult to repair, or any number of other catastrophe's, but this dough, I had no problem with!!! Well, I did have one little issue... I couldn't get the dough to stretch to the correct measurements of 2' by 3' so I think I had too much filling for the size of the dough... In the end, though, the only thing that didn't seem quite right was the fact the the breadcrumbs sort of spilled out of the pastry upon slicing... Also, the only alteration I made was substituting dried cranberries for the raisins...
But, onward... first, the recipe then the photos...
Preparation time
Total: 2 hours 15 minutes – 3 hours 30 minutes
15-20 min to make dough
30-90 min to let dough rest/to prepare the filling
20-30 min to roll out and stretch dough
10 min to fill and roll dough
30 min to bake
30 min to cool
Apple strudel
from “Kaffeehaus – Exquisite Desserts from the Classic Cafés of Vienna, Budapest and Prague” by Rick Rodgers
2 tablespoons (30 ml) golden rum
3 tablespoons (45 ml) raisins
1/4 teaspoon ground cinnamon
1/3 cup plus 1 tablespoon (80 g) sugar
1/2 cup (1 stick / 115 g) unsalted butter, melted, divided
1 1/2 cups (350 ml) fresh bread crumbs
strudel dough (recipe below)
1/2 cup (120 ml, about 60 g) coarsely chopped walnuts
2 pounds (900 g) tart cooking apples, peeled, cored and cut into ¼ inch-thick slices (use apples that hold their shape during baking)
1. Mix the rum and raisins in a bowl. Mix the cinnamon and sugar in another bowl.
2. Heat 3 tablespoons of the butter in a large skillet over medium-high. Add the breadcrumbs and cook whilst stirring until golden and toasted. This will take about 3 minutes. Let it cool completely.
3. Put the rack in the upper third of the oven and preheat the oven to 400°F (200°C). Line a large baking sheet with baking paper (parchment paper). Make the strudel dough as described below. Spread about 3 tablespoons of the remaining melted butter over the dough using your hands (a bristle brush could tear the dough, you could use a special feather pastry brush instead of your hands). Sprinkle the buttered dough with the bread crumbs. Spread the walnuts about 3 inches (8 cm) from the short edge of the dough in a 6-inch-(15cm)-wide strip. Mix the apples with the raisins (including the rum), and the cinnamon sugar. Spread the mixture over the walnuts.
4. Fold the short end of the dough onto the filling. Lift the tablecloth at the short end of the dough so that the strudel rolls onto itself. Transfer the strudel to the prepared baking sheet by lifting it. Curve it into a horseshoe to fit. Tuck the ends under the strudel. Brush the top with the remaining melted butter.
5. Bake the strudel for about 30 minutes or until it is deep golden brown. Cool for at least 30 minutes before slicing. Use a serrated knife and serve either warm or at room temperature. It is best on the day it is baked.
Strudel dough
from “Kaffeehaus – Exquisite Desserts from the Classic Cafés of Vienna, Budapest and Prague” by Rick Rodgers
1 1/3 cups (200 g) unbleached flour
1/8 teaspoon salt
7 tablespoons (105 ml) water, plus more if needed
2 tablespoons (30 ml) vegetable oil, plus additional for coating the dough
1/2 teaspoon cider vinegar
1. Combine the flour and salt in a stand-mixer fitted with the paddle attachment. Mix the water, oil and vinegar in a measuring cup. Add the water/oil mixture to the flour with the mixer on low speed. You will get a soft dough. Make sure it is not too dry, add a little more water if necessary.
Take the dough out of the mixer. Change to the dough hook. Put the dough ball back in the mixer. Let the dough knead on medium until you get a soft dough ball with a somewhat rough surface.
2. Take the dough out of the mixer and continue kneading by hand on an unfloured work surface. Knead for about 2 minutes. Pick up the dough and throw it down hard onto your working surface occasionally.
Shape the dough into a ball and transfer it to a plate. Oil the top of the dough ball lightly. Cover the ball tightly with plastic wrap. Allow to stand for 30-90 minutes (longer is better).
3. It would be best if you have a work area that you can walk around on all sides like a 36 inch (90 cm) round table or a work surface of 23 x 38 inches (60 x 100 cm). Cover your working area with table cloth, dust it with flour and rub it into the fabric. Put your dough ball in the middle and roll it out as much as you can.
Pick the dough up by holding it by an edge. This way the weight of the dough and gravity can help stretching it as it hangs. Using the back of your hands to gently stretch and pull the dough. You can use your forearms to support it.
4. The dough will become too large to hold. Put it on your work surface. Leave the thicker edge of the dough to hang over the edge of the table. Place your hands underneath the dough and stretch and pull the dough thinner using the backs of your hands. Stretch and pull the dough until it's about 2 feet (60 cm) wide and 3 feet (90 cm) long, it will be tissue-thin by this time. Cut away the thick dough around the edges with scissors. The dough is now ready to be filled.
Tips
- Ingredients are cheap so we would recommend making a double batch of the dough, that way you can practice the pulling and stretching of the dough with the first batch and if it doesn't come out like it should you can use the second batch to give it another try;
- The tablecloth can be cotton or polyster;
- Before pulling and stretching the dough, remove your jewelry from hands and wrists, and wear short-sleeves;
- To make it easier to pull the dough, you can use your hip to secure the dough against the edge of the table;
- Few small holes in the dough is not a problem as the dough will be rolled, making (most of) the holes invisible.
Both Courtney and I did a trial run on making the strudel. Below are our notes:
Courtney's notes
- She could't get it to stretch to 2 feet by 3 feet, it turned out more like 2 feet by 2 feet. But the dough was tissue thin nevertheless;
- She got some serious holes, but after rolling it wasn't noticeable;
- She used a large cheese cloth which helped manipulate and stretch the dough more than a heavier cloth would have.
Linda's notes
- I made the dough by hand, just mixed the wet ingredients into the dry ingredients with a wooden spoon. Kneaded it for about 5 min like you would bread dough. This worked as well. Haven't tried using a standmixer so I don't know how it compares.
- Instead of cider vinegar I used red wine vinegar;
- I used bread flour;
- Picking up the dough to let it stretch didn't work well for me, holes appeared pretty much instantly. Instead I stretched the dough while it was lying on the tablecloth by putting my hands underneath and stretching it out further and further;
Here's a link to a strudelmaking video that might help you a bit...
Tuesday, April 28, 2009
A Cheesecake Challenge
The April 2009 challenge is hosted by Jenny from Jenny Bakes. She has chosen Abbey's Infamous Cheesecake as the challenge.
Hello, all... Cheesecake, it is... No problems here since cheesecake is one of our specialties!!! BUT since we have moved from the lovely state of New York to the lovely state of Florida, and have NO idea where our cameras are, we were unable to take photos in time...
Abbey's Infamous Cheesecake:
crust:
2 cups / 180 g graham cracker crumbs
1 stick / 4 oz butter, melted
2 tbsp. / 24 g sugar
1 tsp. vanilla extract
cheesecake:
3 sticks of cream cheese, 8 oz each (total of 24 oz) room temperature
1 cup / 210 g sugar
3 large eggs
1 cup / 8 oz heavy cream
1 tbsp. lemon juice
1 tbsp. vanilla extract (or the innards of a vanilla bean)
1 tbsp liqueur, optional, but choose what will work well with your cheesecake
DIRECTIONS:
1. Preheat oven to 350 degrees F (Gas Mark 4 = 180C = Moderate heat). Begin to boil a large pot of water for the water bath.
2. Mix together the crust ingredients and press into your preferred pan. You can press the crust just into the bottom, or up the sides of the pan too - baker's choice. Set crust aside.
3. Combine cream cheese and sugar in the bowl of a stand-mixer (or in a large bowl if using a hand-mixer) and cream together until smooth. Add eggs, one at a time, fully incorporating each before adding the next. Make sure to scrape down the bowl in between each egg. Add heavy cream, vanilla, lemon juice, and alcohol and blend until smooth and creamy.
4. Pour batter into prepared crust and tap the pan on the counter a few times to bring all air bubbles to the surface. Place pan into a larger pan and pour boiling water into the larger pan until halfway up the side of the cheesecake pan. If cheesecake pan is not airtight, cover bottom securely with foil before adding water.
5. Bake 45 to 55 minutes, until it is almost done - this can be hard to judge, but you're looking for the cake to hold together, but still have a lot of jiggle to it in the center. You don't want it to be completely firm at this stage. Close the oven door, turn the heat off, and let rest in the cooling oven for one hour. This lets the cake finish cooking and cool down gently enough so that it won't crack on the top. After one hour, remove cheesecake from oven and lift carefully out of water bath. Let it finish cooling on the counter, and then cover and put in the fridge to chill. Once fully chilled, it is ready to serve.
Pan note: The creator of this recipe used to use a springform pan, but no matter how well she wrapped the thing in tin foil, water would always seep in and make the crust soggy. Now she uses one of those 1-use foil "casserole" shaped pans from the grocery store. They're 8 or 9 inches wide and really deep, and best of all, water-tight. When it comes time to serve, just cut the foil away.
Prep notes: While the actual making of this cheesecake is a minimal time commitment, it does need to bake for almost an hour, cool in the oven for an hour, and chill overnight before it is served. Please plan accordingly!
So we used this basic recipe and added our raspberry coulis to make our famous raspberry heart cheesecake... It came out almost exactly the same as the recipe we used and tasted just as delicious!!!
Our apologies about no photos, but we're up for next month's challenge!!! Now on to warmer weather!!!
Tuesday, March 31, 2009
The time has come, the walrus said....

...To get our butts to a warmer climate! We're packing up and getting out of Dodge - to be near family and the beach! Joe has been given a wonderful opportunity to open a new store in Tampa, Florida, and we're jumping on it. My entire family is within two hours of there, and since I haven't had much time to spend with my eighty-two-year-old mother in the past several years, I am thrilled to be moving to her area. We will be temporarily closing up shop here at Joey Biscotti! but once we get settled in Florida, we'll reopen with a sweet vengeance. We'll have to do some product testing down there and garner new customers, but we've found that, "if you bake it, they will come...." And we're excited about making new friends, but will dearly miss the old ones. We're so thankful to have met and been able to share our lives and our baked goods with so many of you here on the east coast, and though we'll be on the west coast of Florida - we're only moments away on the internet, and plan on staying that way. We'll still be able to ship cookies and biscotti, and hope that our friends from all over the country will continue to keep us in mind when ordering for those special occasions, holidays, and midnight snack attacks!
Stay tuned for interesting up-dates about our experience of moving and making a fresh start.
Ciao for now...
'Da Boys
Subscribe to:
Posts (Atom)